Growing corn from seed to harvest can be a rewarding experience for anyone who’s interested in gardening. You’ll want to ensure that you’re growing it in an area with plenty of sunlight and well-draining soil, as these conditions are crucial for healthy growth. Climate also plays a significant role in determining the best time to plant and how often to water your corn crop. With proper care, a single planting can yield a bountiful harvest of juicy ears that will be perfect for roasting or boiling. In this guide, we’ll cover everything you need to know about growing corn, including climate considerations, soil preparation, and optimal planting techniques. By the time you finish reading, you’ll have all the information necessary to successfully grow a thriving crop of corn in your own garden.
Understanding Corn Growth Basics
To grow healthy and thriving corn, it’s essential to understand the basics of its growth cycle, from germination to maturity. Let’s start by examining how corn develops its roots, stalks, and ears.
Climate and Soil Requirements
Corn grows best in temperate climates with moderate temperatures and adequate moisture. The ideal temperature range for corn growth is between 65°F (18°C) and 85°F (30°C). Temperatures above 90°F (32°C) can slow down growth, while prolonged exposure to temperatures below 55°F (13°C) can damage the plant. Corn requires a growing season of at least 120 days with warm temperatures and adequate moisture.
Soil pH is another crucial factor in corn growth. Most corn varieties thrive in slightly acidic to neutral soil with a pH between 6.0 and 7.0. Soil pH levels outside this range can affect nutrient availability, leading to reduced yields or poor plant health. For example, if the soil pH is too low (acidic), nutrients like phosphorus become less available to the plant.
In terms of moisture, corn requires consistent and adequate water supply throughout its growth stages. Aim for about 20-25 inches of rainfall per growing season, with most of it occurring during the tassel emergence stage. Avoid overwatering, which can lead to root rot and other issues. Proper irrigation management is essential to ensure healthy plant growth and high yields.
Choosing the Right Corn Variety
When choosing a corn variety, it’s essential to consider the type of corn you want to grow and its specific growing needs. There are three main types: sweet corn, dent corn, and popcorn. Sweet corn is ideal for fresh consumption and requires more moisture and nutrients than other varieties. Dent corn, also known as field corn, is used for animal feed, ethanol production, and human food, but it’s less sensitive to soil quality. Popcorn is a specialty crop that demands well-drained soil and full sun.
Before selecting a variety, research the specific needs of each type in your region and climate. For example, sweet corn requires at least 65°F (18°C) for germination and consistent moisture throughout its growth cycle. Dent corn can tolerate a broader range of temperatures but benefits from adequate nitrogen levels.
When selecting a variety, consider factors such as maturity days, disease resistance, and yield potential. Look for varieties that are bred for your local climate conditions or have been tested in nearby regions. Check seed catalogs or online resources for specific information on each variety’s growing requirements and performance data. This will help you make an informed decision and increase the chances of a successful harvest.
Planning and Preparation
Before you start planting, it’s essential to plan out your corn-growing project carefully, considering factors like climate, soil quality, and space constraints.
This includes determining the best time to plant, selecting a suitable variety, and preparing the necessary equipment.
Site Selection and Layout
When selecting a site for growing corn, sunlight exposure is crucial. Corn requires full sun to produce well, so choose a location that receives direct sunlight for at least 6 hours a day. Avoid areas with trees or buildings that may cast shade, especially during the critical growth stages.
Wind direction also plays a significant role in corn growth. A gentle breeze can help pollinate the plants, but strong winds can damage the stalks and ears of corn. Ideally, position your corn crop to face away from prevailing winds to minimize damage.
Another essential consideration is proximity to water sources. Corn needs consistent moisture, especially during the germination and tilling stages. Ensure that your site has access to a reliable water supply or irrigation system. Typically, a distance of 50-100 feet between the corn patch and any water source is sufficient. However, this may vary depending on your specific climate and soil conditions.
Some common mistakes to avoid include planting corn in low-lying areas prone to waterlogging, as this can lead to root rot and other issues. Similarly, sites with poor drainage can cause the roots to become waterlogged, reducing yields.
Preparing the Soil
Tilling is a crucial step in preparing the soil for corn growth. It involves breaking up and aerating the soil to a depth of 8-10 inches. This process helps to loosen compacted soil, reduce soil density, and improve drainage. You can use a rototiller or a garden fork to till the soil, depending on its texture and size.
Fertilizing is another essential step in preparing the soil for corn growth. Corn requires a balanced diet of nitrogen, phosphorus, and potassium to grow well. Test your soil regularly to determine its nutrient levels and pH. Based on the test results, apply the necessary fertilizers according to their instructions. Organic matter such as compost or manure can also be incorporated into the soil to improve its fertility.
Incorporating organic matter not only adds nutrients but also improves the soil’s structure and water-holding capacity. You can add a 2-3 inch layer of compost or well-rotted manure to the topsoil, then mix it in using a tiller or spade. This will help to create a fertile environment for your corn plants to grow strong and healthy.
Planting and Seed Selection
Choosing the right seeds for your corn crop is crucial, so let’s take a closer look at how to select high-quality seed varieties that thrive in your climate. We’ll also cover essential planting tips to get you started on the right foot.
Sowing Seeds at the Right Time
In temperate climates, the ideal time to plant corn is when the soil has warmed up to at least 55°F (13°C). This usually occurs about a week after the last frost date for your area. In warmer regions, such as USDA Hardiness Zones 9 and above, corn can be planted year-round. However, in cooler zones, it’s essential to wait until late spring or early summer when the soil has reached a suitable temperature.
To determine if the soil is ready, check its temperature by inserting a finger into the ground up to the knuckle. If you can comfortably hold your hand in the soil for about 10 seconds, it’s warm enough to plant corn. In areas with mild winters, you may be able to plant corn as early as late winter or early spring.
When planting, sow seeds 1 inch deep and 6-8 inches apart. This will give each seedling room to grow without overcrowding. Plant in rows that are spaced 3 feet apart for easy access during growth and harvesting. For more precise temperature guidance, consult the specific climate and region guidelines for your area. Keep in mind that these temperatures may vary depending on the corn variety you’re growing.
Using Quality Seeds and Seed Treatments
Using high-quality seeds is essential for a successful corn crop. Low-grade seeds can result in poor germination rates and stunted growth. To ensure you’re starting with the best possible seeds, store them properly. Keep seeds in an airtight container, such as a glass jar or plastic bin, to maintain humidity and protect against pests.
When storing seeds for extended periods, keep them refrigerated between 32°F and 40°F (0°C and 4°C). For shorter-term storage, a cool, dry place is suitable. Do not store seeds near direct sunlight, moisture, or heat sources. Seeds that are exposed to these conditions may lose viability.
Seed treatments can also play a crucial role in your corn crop’s success. Treatments like fungicides and insecticides can help protect against pests and diseases. However, be sure to follow the manufacturer’s instructions carefully when applying seed treatments. Improper application can harm the seeds or the soil. A general rule of thumb is to apply treatments only as needed, based on specific regional conditions and weather forecasts.
Corn Growth Stages and Care
Understanding corn growth stages is crucial for successful cultivation, and proper care at each stage can make all the difference in your harvest. Let’s break down the essential steps to ensure your corn grows strong and healthy.
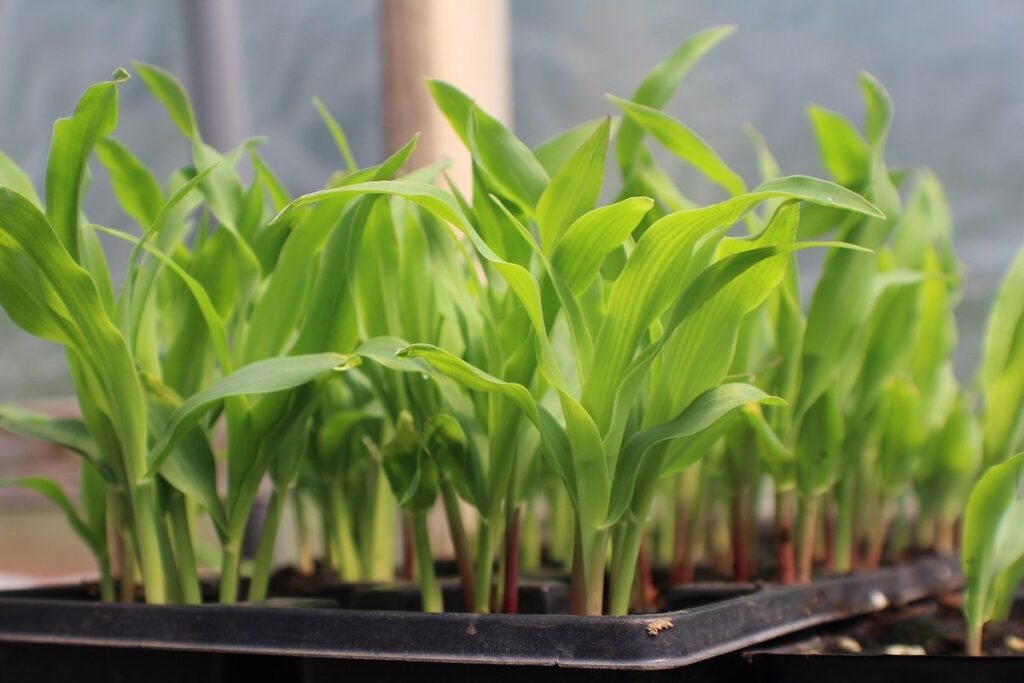
Germination and Emergence
Germination occurs when a corn seed absorbs water and begins to sprout. This process typically takes 7-10 days for most sweet corn varieties, but can be influenced by factors like soil temperature and moisture levels. For optimal germination, the soil should be kept consistently moist during this period.
A good starting point is to plant seeds about 1 inch deep in well-draining soil with a temperature of at least 55°F (13°C). Most corn seeds have an embryo that’s already started growing when they’re planted, so they can take off quickly once conditions are right. Avoid overwatering, as this can lead to seed rot and poor emergence.
As the seedling emerges, it will develop its first set of leaves – called the “coats” – which provide essential nutrients for growth. After about a week or two, you’ll start seeing a second leaf pair emerge above the coats, signaling that the plant has entered a more rapid growth phase. Keep in mind that some varieties may have slightly longer germination periods, so be sure to check the seed package instructions.
In general, it’s essential to provide a warm and humid environment for the seeds during this initial stage. This can involve using row covers or black plastic mulch to retain moisture and heat.
Vegetative and Reproductive Growth
During the vegetative stage, corn plants focus on developing their roots and leaves. Adequate nitrogen, phosphorus, and potassium levels are crucial for healthy growth. A balanced fertilizer application at planting time can provide a solid foundation, but supplemental feeding may be necessary later in the season, especially if soil tests reveal deficiencies.
As corn transitions to its reproductive stage, it requires different nutrient ratios. Phosphorus and potassium become more important for pollination and kernel development, while nitrogen needs decrease slightly. To optimize yield, farmers often split fertilizer applications into two or three installments, timing them with key growth milestones like silking and tasseling.
Effective pest management during these stages is also vital. Common pests like aphids, earworms, and raccoons can significantly impact yields. Regularly inspecting fields for signs of infestation and using integrated pest management strategies – such as introducing beneficial insects or applying targeted pesticides – can help mitigate damage.
Common Challenges and Solutions
Growing corn can be a rewarding experience, but it’s not without its challenges. In this section, we’ll address some of the most common issues you might face when growing corn at home.
Dealing with Pests and Diseases
Corn is susceptible to various pests and diseases that can significantly impact yields. Among the most common issues are earworms, corn borers, and root maggots. These pests feed on leaves, stalks, and ears, causing damage and weakening the plant’s structure.
To identify earworms, look for distinctive holes or tears in the leaves or ears. Corn borers, on the other hand, create small holes at the base of the leaf stalks. Root maggots are harder to spot but can cause stunted growth and yellowing leaves.
Several diseases also affect corn crops, including rust, smut, and Stewart’s wilt. Rust appears as orange or yellow spores on the leaves, while smut causes the ears to rot. Stewart’s wilt is a bacterial disease characterized by stunted growth, yellowing leaves, and premature death.
Effective management involves integrating physical barriers, such as fine-mesh screens or row covers, with biological controls like beneficial insects. Crop rotation and sanitation can also help reduce pest populations. For instance, rotating corn with soybeans or wheat can disrupt the life cycle of certain pests. Regularly inspect your plants for signs of infestation or disease, and address issues promptly to prevent widespread damage.
Weather-Related Issues
Weather-related issues can severely impact corn growth and yield. Droughts can cause moisture stress, reducing plant vigor and increasing susceptibility to pests and diseases. Flooding can lead to root rot and other water-borne diseases. Heatwaves can accelerate plant development but also increase the risk of heat stress.
To mitigate damage from droughts, ensure your soil has adequate water-holding capacity by incorporating organic matter and using conservation tillage. Plant drought-tolerant corn varieties, such as ‘DroughtGard’ or ‘Agrisure Duracade’, which have built-in drought protection. Implement efficient irrigation systems that deliver the right amount of water at the right time.
Flooding can be prevented by selecting well-drained fields and avoiding low-lying areas. If flooding is unavoidable, consider using flood-tolerant corn varieties like ‘Liberty Link’ or ‘SmartStax’. Remove excess water as soon as possible to minimize damage.
Heatwaves can be mitigated by selecting heat-tolerant corn hybrids, planting at the right time for your region, and providing adequate air circulation. Avoid excessive nitrogen applications, which can exacerbate heat stress.
Harvesting and Storage
Now that your corn is ready, it’s essential to harvest and store it properly to maintain its quality and ensure a long shelf life. Effective storage techniques will help you enjoy your homegrown corn for months to come.
Determining Maturity and Harvest Time
Determining corn maturity and harvest time is crucial to ensure a successful crop. Visual inspections are an essential method for determining when corn is ready to be harvested. Check the kernels by gently pulling back the husk; they should be fully formed, plump, and have a hard texture. The color of the kernels also indicates maturity: white or light-colored kernels are typically mature, while yellow or pink kernels may not be yet.
Another way to determine corn maturity is through moisture testing. Use a moisture meter to check the percentage of moisture in the ear. Most corn varieties should have a moisture level between 20-30% for optimal dry-down and storage. However, some sweet corn varieties can remain at higher moisture levels (around 40-50%) before harvest.
Check the husk color as well: it should be fully yellow or brown, indicating that the plant has stopped producing sugars. Avoid pulling back the husk too aggressively, which can damage the ear. If you’re unsure about the maturity of your corn, consult with a local expert or check the specific variety’s recommended harvest time.
Proper Handling and Storage Techniques
To maintain corn’s quality and nutritional value, it’s crucial to handle and store it properly. Start by drying the ears thoroughly, either by tying them in small bundles and hanging them upside down or using a machine designed for drying corn. This step is essential to prevent mold growth and spoilage.
When storing dried corn, keep it away from direct sunlight and moisture. Store the ears in a cool, dry place with good ventilation, such as a basement or attic. You can also store shelled corn in airtight containers, like plastic bins or paper bags.
Avoid storing corn near its maturity date, as this can lead to a higher risk of spoilage. Typically, it’s best to harvest mature corn within 10-14 days of the husk drying and turning brown. If you must store immature corn, ensure it’s completely dry before storage.
For long-term storage, consider using Mycoguard or similar products that inhibit fungal growth. These can be applied according to the manufacturer’s instructions.
Frequently Asked Questions
Can I grow corn in containers or raised beds?
You can grow corn in containers or raised beds, but it’s essential to choose varieties specifically bred for these conditions. Look for compact or dwarf varieties that are suitable for smaller spaces and have a shorter growing season.
What if my soil pH is outside the optimal range for corn growth?
While soil pH between 6.0 and 7.0 is ideal for corn, you can still grow it in slightly acidic or alkaline conditions. However, you may need to adjust your fertilization schedule accordingly. For example, if your soil is too alkaline, you may want to add sulfur to lower the pH.
How do I know when my corn is ready to harvest, and what are the signs of maturity?
Corn is typically ready to harvest when the kernels are fully formed and the juice from a kernel tastes sweet. You can also check for physical signs such as the husks turning brown or the silk drying out. Additionally, if you’re growing dent corn, check for the characteristic dent in the ear.
Can I save seeds from my own corn crop to plant next year?
While it’s technically possible to save seeds from your own corn crop, it may not be the best option. Corn is a hybrid or open-pollinated variety, and saving seeds can lead to inconsistent results or reduced yields. Instead, consider purchasing new seeds each season to ensure optimal growth and productivity.
What if I experience a late frost after planting my corn? Will the damage be extensive?
A late frost can indeed damage or kill emerging corn plants. However, the extent of the damage depends on the severity of the frost and the stage of development of your crop. If you’ve planted cold-tolerant varieties or taken steps to protect your crop (such as using row covers), the damage may be minimal.
