Germinating seeds is often the most critical step in ensuring your plants thrive. However, many gardeners struggle with getting their seeds to sprout, resulting in wasted time and effort. You’ve likely experienced the frustration of watching a seed sit dormant for weeks, or worse, only to have it rot without producing any signs of growth. This comprehensive guide is designed to help you overcome these challenges by providing a clear understanding of how to germinate seeds successfully.
The key to successful seed germination lies in selecting the right seeds for your climate and environment, preparing them properly before planting, and creating optimal growing conditions that promote healthy root development. By mastering these essential techniques, you’ll be able to achieve a high success rate with your plants and enjoy the satisfaction of watching them grow from seed to maturity. This article will walk you through each step, equipping you with the knowledge needed to germinate seeds like a pro.
Choosing the Right Seeds
When selecting seeds for germination, it’s crucial to choose high-quality seeds that are suitable for your climate and the specific plant variety you’re trying to grow. This will ensure optimal results from your seed-starting efforts.
Understanding Seed Viability and Freshness
When selecting seeds for germination, it’s essential to consider their viability and freshness. Seed age is a significant factor; most seed banks recommend using seeds within one to three years of storage. However, some varieties, such as orchids or certain wildflowers, may remain viable for up to five years.
Proper storage conditions also affect seed longevity. Seeds kept in a cool, dry place, away from direct sunlight and moisture, tend to last longer than those exposed to extreme temperatures or humidity fluctuations. Check the packaging for any visible signs of damage or tampering.
Look for seeds stored in airtight containers or sealed packets, as these provide better protection against moisture and contamination. Some seed suppliers include a “packaged date” or “best-by” label on their products; use this information to gauge the seed’s viability.
Freshness can also be indicated by the presence of a certification from reputable organizations like the Association of Official Seed Analysts (AOSA) or the National Institute of Food and Agriculture (NIFA). When in doubt, it’s best to err on the side of caution and choose seeds with proven track records for germination success.
Selecting Seeds for Your Climate and Region
When selecting seeds for germination, it’s essential to choose varieties adapted to your local climate and region. This ensures the seedlings will thrive once transplanted outdoors. Consider the average temperature, rainfall patterns, and sunlight duration specific to your area.
For example, if you live in a hot and dry climate like Arizona or California, look for seeds that are resistant to heat stress and drought. In contrast, seeds suited for cooler temperatures and higher humidity are better for areas with mild winters and cool summers.
Check the seed packet or catalog description for information on temperature tolerance and hardiness zones. Many seed companies provide detailed growing instructions based on region and climate. Look for specific mentions of disease resistance, pest tolerance, and adaptability to local weather conditions.
Some seeds are bred specifically for certain climates or regions. For instance, “Southern” or “Heat-Tolerant” varieties are ideal for warm-weather gardening. Similarly, “Cool Season” crops excel in areas with mild winters and cooler summers.
When selecting seeds, prioritize those that match your local climate and region. This simple step can significantly increase the chances of successful germination and healthy seedling growth.
Preparing the Seeds for Germination
First, we need to prepare our seeds by checking them for any damage and making sure they’re clean and dry. This step is crucial to ensure successful germination.
Soaking and Scarification Techniques
When it comes to breaking down seed dormancy and promoting germination, two essential techniques are soaking and scarification. Soaking involves submerging seeds in water to soften their outer layers and facilitate moisture uptake. This method is particularly effective for hard-coated seeds like beans, peas, and some varieties of squash. To soak seeds, fill a container with lukewarm water, add the seeds, and let them sit for 24-48 hours.
Scarification involves scratching or nicking the seed coat to create a small opening through which moisture can enter. This technique is often used for seeds with extremely hard coats, such as some species of maple or walnut trees. To scarify seeds, use a nail file or sandpaper to gently scratch the surface, taking care not to damage the underlying embryo.
Stratification is another method that involves subjecting seeds to cold temperatures to break dormancy. This process can be done by placing seeds in a sealed container or plastic bag and storing them in the refrigerator for several weeks. A good example of stratification in action is with seeds like winter aconite, which require 12-14 weeks of cold stratification before germination will occur.
For some seeds, a combination of soaking and scarification may be necessary to achieve successful germination.
Using Seed Starters or Planters
Using seed starters or planters offers several benefits for germinating seeds. One significant advantage is improved germination rates. Seeds started in a controlled environment tend to germinate more consistently and quickly, which can be attributed to the optimal moisture levels and temperatures provided by these containers. Additionally, using seed starters or planters reduces transplant shock when seedlings are later transferred to larger pots or directly into the garden.
Seed starters or planters come in various shapes, sizes, and materials, making it easy to find one that suits your needs. Some popular options include plastic cell trays, biodegradable peat pods, and wooden planters. When choosing a seed starter or planter, consider the type of seeds you’re working with and their specific requirements for germination.
A good rule of thumb is to use a seed starter or planter that’s at least 1-2 inches deep to accommodate the root development of your seeds. Fill the container with a well-draining potting mix, moisten it gently but thoroughly, and sow the seeds according to their depth requirements. This setup will provide your seeds with the best chance to germinate successfully and thrive once they’re transferred to a larger environment.
Creating an Optimal Germination Environment
To ensure successful seed germination, it’s crucial to provide seeds with the right conditions. In the following steps, we’ll guide you through creating a perfect environment for optimal growth and development.
Temperature Requirements for Different Seeds
Most seeds have optimal temperature ranges for germination, and failing to meet these requirements can significantly reduce germination rates. For example, lettuce and other leafy greens typically germinate between 40°F (4°C) and 70°F (21°C), while tomatoes require a warmer temperature range of 65°F (18°C) to 85°F (29°C). On the other hand, some seeds like corn and squash prefer temperatures above 70°F (21°C).
Other factors to consider are the seed’s origin and type. Warm-season crops such as peppers and eggplants thrive in warmer temperatures, while cool-season crops like broccoli and cauliflower do better in cooler temperatures. It’s also worth noting that some seeds may require a period of cold stratification before germinating.
Here are some general guidelines for common types of seeds:
- Vegetables: Most vegetables prefer daytime temperatures between 65°F (18°C) and 75°F (24°C), with cooler nighttime temperatures.
- Fruits: Many fruits, such as strawberries and blueberries, require warmer temperatures around 70°F (21°C) to 80°F (27°C).
- Flowers: Some flowers like marigolds and zinnias can germinate in as low as 40°F (4°C), while others like begonias prefer warmer temperatures above 60°F (15°C).
Keep in mind that these are general guidelines, and specific temperature requirements may vary depending on the seed variety.
Providing Adequate Moisture and Humidity
Maintaining consistent moisture levels and humidity is crucial during germination. Seeds need a controlled environment to break dormancy and sprout. Water plays a significant role in this process. Too little water, and seeds may not be able to absorb the necessary nutrients for germination. On the other hand, too much water can lead to over-saturation, causing roots to rot before they’ve even emerged.
To achieve optimal moisture levels, use a tray or a propagation mat with built-in water reservoirs. These systems allow you to maintain consistent moisture without having to constantly check and adjust the water level. For example, the Rapid Rooter tray has multiple small cups that hold water, which is then absorbed by the seedlings through their roots.
Maintaining humidity levels between 70-90% during germination also promotes healthy growth. You can cover your tray or container with a clear plastic bag or a cloche to maintain high humidity and regulate temperature fluctuations. This will help create an optimal environment for seeds to sprout without drying out.
Check the seed package or research specific requirements for your plant species, as some may have unique needs regarding moisture and humidity levels during germination.
Monitoring and Maintaining Seedlings
Now that your seeds have germinated, it’s essential to monitor their progress closely and provide them with the right conditions for healthy growth. This includes keeping the soil consistently moist and providing adequate light.
Recognizing Germination Stages and Timing
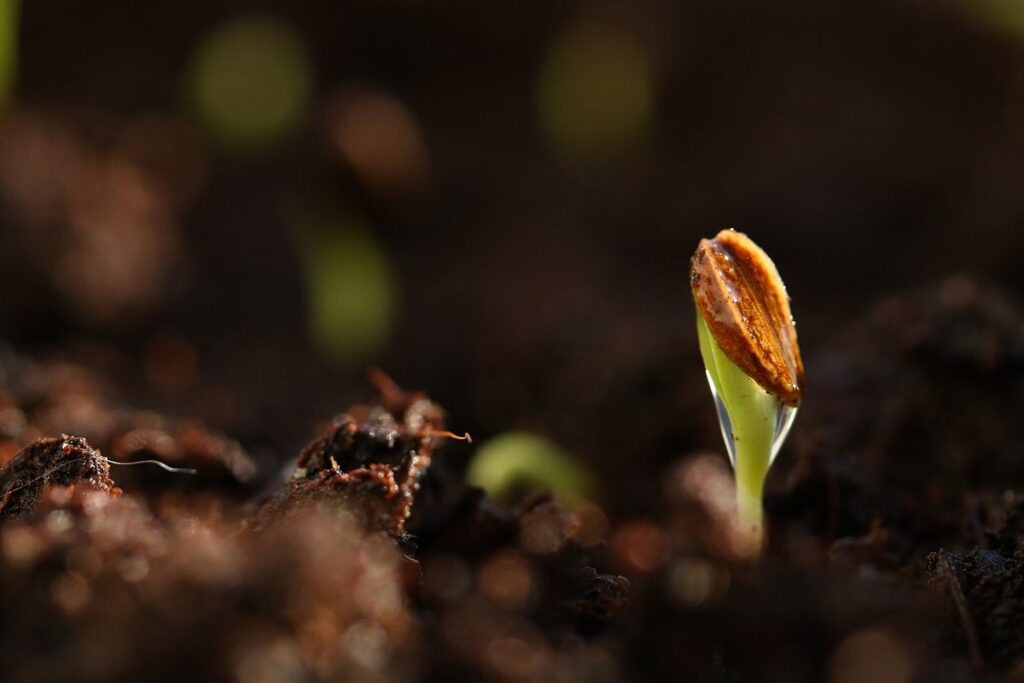
As seeds begin to germinate, you’ll notice distinct stages of development. One of the most critical signs is seed sprouting – usually visible as a small white root emerging from the soil. This indicates that water has reached the embryo inside the seed, and it’s starting to grow.
Next, the radicle emerges, followed by cotyledon (seed leaf) development. The radicle grows downward into the soil, anchoring the seedling, while the cotyledons push upward, absorbing sunlight for photosynthesis. Keep in mind that different seeds germinate at varying rates; some may take longer to sprout than others.
To accurately identify these stages, monitor your seedlings daily, especially during the first week after sowing. Look for subtle changes in color, texture, and size. For example, you might notice a slight darkening of the seed coat or an increase in seedling height. Be patient – it’s essential to recognize each stage before making decisions about their care.
Here are some general guidelines to keep in mind:
• Seed sprouting: usually 1-3 days after sowing
• Radicle emergence: within 2-4 days of sprouting
• Cotyledon development: typically visible 5-7 days post-sowing
Transplanting Seedlings into Larger Containers
When transplanting seedlings into larger containers or directly into gardens, handle them gently to minimize root disturbance. Start by preparing a new pot or container with fresh, well-draining soil that’s at least 1-2 inches deeper than the original seedling depth. Water the seedling thoroughly before carefully removing it from its current container.
Use a gentle twisting motion to loosen the roots, rather than pulling on the stem. For seedlings grown in small cells, use a fork or chopstick to carefully pry them loose. If the seedling’s roots have become pot-bound, gently tease out the tangles with your fingers or a blunt instrument.
Plant the seedling at the same depth as before and water thoroughly. Make sure not to compact the soil around the roots, which can lead to poor growth and increased susceptibility to disease. For garden transplantation, choose a spot with suitable light, temperature, and moisture conditions for the specific plant species. Harden off seedlings by gradually exposing them to outdoor conditions over 7-10 days before transplanting.
Troubleshooting Common Germination Issues
Don’t worry if your seeds aren’t sprouting right away, common issues like slow germination and failed growth can happen to anyone. We’ll tackle these problems head-on in the following section.
Identifying Causes of Poor Germination Rates
Over-watering is a common mistake that can prevent seeds from germinating. When seeds are submerged in water for too long, they can rot and become unusable. Check the moisture level of your seed starting mix by gently squeezing a small amount between your fingers. If it’s too wet, allow it to dry out slightly before trying again.
Inadequate temperature control is another factor that can impact germination rates. Different seeds have optimal temperature ranges for germination; some prefer warmer temperatures around 70-80°F (21-27°C), while others thrive in cooler conditions between 60-70°F (15-21°C). Research the specific temperature requirements for your seed type to ensure you’re providing the right environment.
Under-watering can also be a problem, especially if the soil is too dry. Seeds need consistent moisture to germinate, but they shouldn’t be waterlogged. Aim for a balance by keeping the soil consistently moist during the first few weeks after sowing. You can use a spray bottle to gently mist the soil daily, or water from below using a tray filled with water and pebbles.
Common temperature ranges for different seeds are:
- Warm-season crops (tomatoes, peppers): 75-85°F (24-29°C)
- Cool-season crops (broccoli, kale): 65-75°F (18-24°C)
- Root vegetables (carrots, beets): 60-70°F (15-21°C)
Strategies for Overcoming Germination Challenges
Adjusting soil pH is a simple yet effective strategy for overcoming germination challenges. Most seeds have an optimal pH range for germination, typically between 6.0 and 7.0. If your soil’s pH is outside this range, it can inhibit seed growth or even prevent germination altogether. To adjust the pH, you can mix in small amounts of lime to raise the pH or sulfur to lower it.
Another approach is to use plant growth regulators (PGRs) like gibberellins or auxins. These hormones promote cell elongation and division, which can help seeds break dormancy and germinate more easily. Some commercial seed products contain PGRs that have been shown to improve germination rates in difficult-to-grow species.
Avoid using excessive amounts of fertilizers, as these can burn young seedlings and hinder growth. Instead, opt for balanced fertilizers with a slow release formula to provide nutrients during the seedling stage. Additionally, some seeds benefit from a cold stratification period before sowing, which involves placing them in a refrigerator or cool location to break dormancy.
Advanced Techniques for Seed Germination
If you’re experiencing difficulties getting your seeds to germinate, it’s time to try some advanced techniques that can give them a boost. We’ll explore methods like stratification and scarification to get you started.
Hydroponic and Aeroponic Methods
Hydroponic and aeroponic methods offer a more controlled environment for seed germination. In hydroponics, seeds are suspended in a nutrient-rich solution rather than soil. This allows for precise control over the amount of nutrients delivered to the roots, promoting healthy growth from the start. For example, using a hydroponic system with pH-controlled water can reduce the risk of nutrient deficiencies and ensure consistent seedling development.
Aeroponics takes this concept further by spraying nutrient-rich mist onto the roots rather than submerging them in solution. This method is particularly effective for small seeds or those with delicate root systems. However, both hydroponic and aeroponic methods require specialized equipment, which can be an initial investment. Some benefits of these advanced methods include:
- Increased germination rates due to precise nutrient delivery
- Reduced water consumption compared to traditional soil-based methods
- Improved control over pH levels and temperature
- Potential for faster growth rates
It’s essential to research and understand the specific needs of your chosen seeds before adopting hydroponic or aeroponic methods. These systems can be more complex than traditional seed starting, but they offer a high degree of precision and control that can lead to better germination results.
Using LED Grow Lights and Other Equipment
LED grow lights are a popular choice for enhancing seed germination. They provide a concentrated source of light, which can increase photosynthesis rates and promote healthy growth. When selecting an LED grow light, consider the spectrum output: cool white (5000-6500K) is ideal for seeds that require high blue light, while warm white (2700-3000K) is better suited for those that prefer more red light.
You can also use heating mats to maintain optimal temperatures. These mats are specifically designed for seed starting and can be set to different temperature ranges. Some popular options include the propagation mat and the seed starting mat. When using a heating mat, ensure it’s placed under the tray or planter and follow the manufacturer’s guidelines for temperature settings.
A propagator is another valuable tool for advanced seed germination techniques. This device maintains consistent humidity levels and can be used in conjunction with LED grow lights to create an optimal environment. Some propagators come equipped with built-in heating mats, while others require a separate unit. Always read reviews and follow the manufacturer’s instructions when choosing and using these devices.
Frequently Asked Questions
Can I Germinate Seeds in Direct Sunlight?
No, it’s best to germinate seeds in indirect sunlight or under grow lights to maintain optimal temperature and prevent over-heating. This ensures the seeds receive consistent moisture levels and develop strong roots.
What Happens if My Seeds Don’t Respond to Soaking or Scarification Techniques?
If your seeds don’t respond to soaking or scarification techniques, it may be due to seed age or viability issues. Try using a different method, such as stratification, or select fresh seeds for better results.
How Do I Know When to Transplant Seedlings into Larger Containers?
Seedlings typically require transplanting when they have 2-3 sets of leaves and their roots have filled the container. Look for signs like yellowing leaves, stunted growth, or excessive watering needs as indicators it’s time to transplant.
Can I Use LED Grow Lights for All Types of Seeds, or Are Some Sensitive to Light?
While LED grow lights are beneficial for seed germination, some seeds may be sensitive to light intensity. Research the specific light requirements for your seed type and adjust accordingly to avoid inhibiting growth or causing damage.
What If I Need to Germinate Seeds in a Small Space with Limited Lighting? Are There Any Compact Options Available?
For small spaces with limited lighting, consider using compact LED grow lights or investing in a propagation tray with built-in heating mats. These options provide controlled temperature and humidity conditions while saving space.
