
As you tend to your beehives, one crucial task stands out: inspecting the hive itself. A thorough examination can mean the difference between a thriving colony and a struggling one, making it an essential skill for any beekeeper. Unfortunately, many beekeepers overlook this critical step, leading to reduced honey production, pest infestations, and disease outbreaks. By mastering the art of beehive inspection, you’ll not only optimize your honey yields but also ensure the long-term health of your colony. In this article, we’ll cover the essential techniques for inspecting your hive, including identifying signs of pests and diseases, monitoring brood health, and optimizing the environment to promote healthy growth. By the end of this guide, you’ll be equipped with the knowledge to perform a thorough and effective beehive inspection that will take your apiary to the next level.
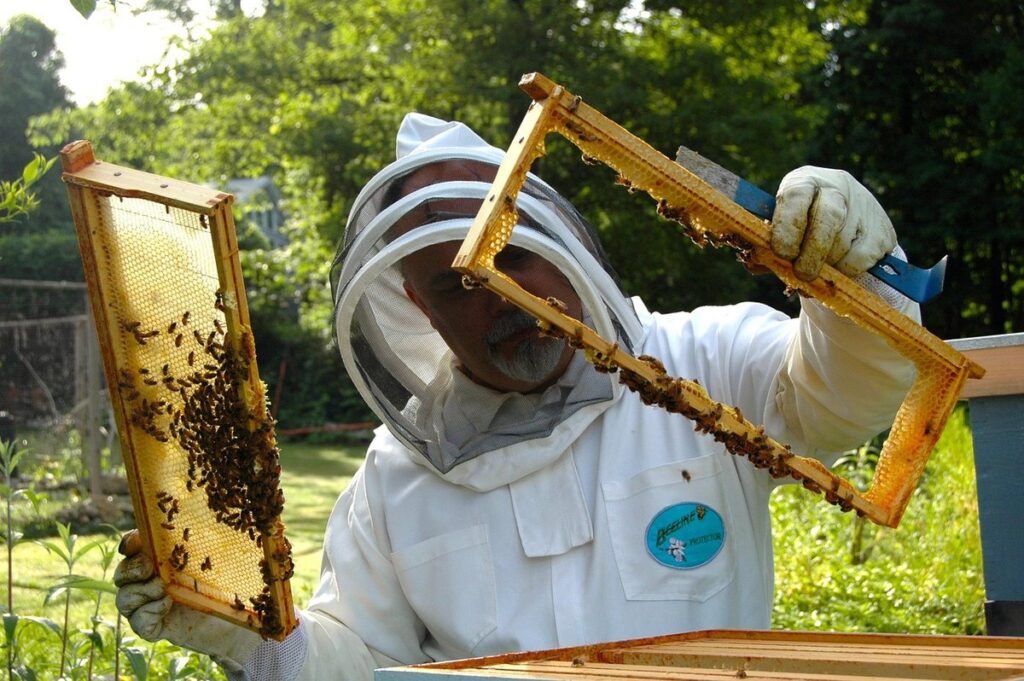
Understanding the Importance of Regular Inspections
Regular inspections are crucial for maintaining a healthy beehive and detecting potential issues before they become major problems. By understanding their importance, you’ll be better equipped to protect your bees and optimize honey production.
Benefits of Regular Inspections
Regular inspections allow you to identify and address issues before they become serious problems. For instance, detecting a pest infestation early on can prevent it from spreading throughout the beehive and causing significant damage. A healthy beehive is also better equipped to produce high-quality honey.
Some of the most notable benefits of regular inspections include:
- Identifying and removing diseased or weak bees, which helps maintain a strong colony
- Detecting nutritional deficiencies and supplementing with necessary nutrients to prevent health issues
- Monitoring for signs of pests, such as small hive beetles or Asian giant hornets, and taking action before infestations get out of control
Regular inspections also enable you to assess the overall health of your queen bee. A healthy queen is essential for optimal honey production, as she lays eggs that grow into worker bees responsible for harvesting nectar and pollen.
By performing regular inspections, you can catch potential problems before they become major issues, maintain a healthy beehive, and maximize your honey production.
Common Issues Found During Inspections
During inspections, beekeepers often encounter common issues that can compromise honey production and colony health. Pests are a significant concern, with varroa mites being one of the most prevalent threats. These parasitic mites feed on bee hemolymph, weakening their immune system and making them more susceptible to disease. American foulbrood and nosema are two bacterial diseases that can devastate a colony if left unchecked.
Nutritional deficiencies also arise during inspections, often due to inadequate forage or poor quality feed. A lack of essential nutrients like protein, sugar, and minerals can lead to stunted growth, reduced honey production, and increased susceptibility to disease. To address this issue, beekeepers may need to supplement their colonies with high-quality feed or ensure access to diverse foraging areas.
Inspectors also look out for signs of nutritional deficiencies in the brood, including weak or deformed larvae, and yellow or discolored adult bees. By recognizing these symptoms early on, beekeepers can take corrective action and implement strategies to prevent future occurrences. Regular inspections are crucial in identifying and addressing these issues before they spiral out of control and impact honey production.
Pre-Inspection Preparation
Before approaching the hive for inspection, it’s crucial to prepare yourself physically and mentally. This involves ensuring you have the necessary protective gear, including a beekeeping suit, veil, and gloves. A well-fitting suit is essential, as it prevents stings from penetrating the fabric. You should also bring a smoker to calm the bees before inspecting the hive. Familiarize yourself with the location of the queen excluder and other internal components to streamline the inspection process.
Take a moment to review your inspection notes from previous visits to identify any ongoing issues or patterns. This will help you focus on specific areas during the current inspection. If you’re inspecting multiple hives, prioritize the ones that require urgent attention based on past observations. It’s also a good idea to have a plan in place for addressing potential problems, such as queen replacement or pest control measures.
In terms of equipment, make sure your hive tool is clean and functional, and consider bringing a small notebook and pen to record any notes during the inspection. By being prepared and organized, you’ll be able to identify issues more efficiently and take corrective action when necessary.
Step-by-Step Inspection Process
To ensure accurate and effective beehive inspection, let’s break down the process into manageable steps that will help you identify potential issues before they impact honey production. This process involves a series of checks and observations.
Approaching the Hive Safely
When approaching a beehive for inspection, safety should be the top priority. This means being mindful of potential hazards and taking necessary precautions to avoid startling the bees. Begin by surveying the surrounding area, ensuring there are no distractions or obstacles that could cause you to lose focus on the hive.
Wear protective clothing, including a beekeeping suit, gloves, and veil, to prevent stings. The suit should be snug-fitting and cover all exposed skin. A good-quality veil will protect your face from potential stings. Consider wearing closed-toe shoes or boots with good traction to avoid slipping on the hive stand.
When approaching the hive, move calmly and deliberately to avoid sudden movements that might provoke the bees. Avoid making loud noises or using strong perfumes, as these can trigger aggressive behavior. It’s also essential to consider the time of day; inspecting a hive during peak sun hours can be hazardous due to increased bee activity.
Before opening the hive, take a moment to observe the bees’ behavior and assess their overall mood. If they appear agitated or aggressive, it may be best to postpone the inspection until conditions are more favorable.
Opening the Hive and Assessing Overall Health
When opening the hive, it’s essential to do so with care to avoid startling the bees or causing unnecessary stress. This not only ensures a safe inspection process but also minimizes disruptions to the colony’s natural behavior. Begin by gently lifting the inner cover and inspecting the hive for any signs of disturbance or damage.
Next, assess the overall health of the colony by looking for indicators such as the presence of capped honey stores, brood distribution, and the queen’s location. Check for any visible pests, diseases, or nutrient deficiencies that may be impacting the colony’s growth. This is also an opportunity to evaluate the hive’s cleanliness and organization.
If you notice any issues during this initial assessment, take note of them and plan accordingly for further inspection or corrective action. A healthy, thriving colony should have a balanced brood pattern with an adequate number of nurse bees and a clear path for worker bees to move through. If these conditions are not met, it may be necessary to re-examine the hive’s setup, nutrition, or pest management strategies.
Examining Brood Patterns and Queen Activity
A healthy beehive will have well-developed brood patterns and a productive queen, both of which are essential for honey production. To examine brood patterns effectively, start by looking at the arrangement of eggs, larvae, and pupae. A strong brood pattern is typically characterized by a mixture of all three stages, with newly laid eggs visible near the bottom of frames. Avoidance or scarcity of any stage can be an indication of issues such as poor queen performance or inadequate nutrition.
When inspecting the brood, pay attention to the presence and positioning of royal cells, which are larger than regular cells and contain developing queens. A small number of royal cells is normal; however, excessive numbers may indicate a problem with your existing queen or a potential swarm issue in the near future.
The queen’s overall health and activity also play a crucial role in brood development. Look for signs of a healthy, active queen such as clear egg-laying patterns and evidence of pheromone trails, which help guide worker bees’ activities.
Identifying Common Issues and Pests
When inspecting your beehive, it’s crucial to recognize potential problems early on, such as diseases, pests, and structural issues that can compromise your honey production. Identifying these common issues promptly is key to preventing costly losses.
Signs of Pest Infestation
When inspecting a beehive for signs of pest infestation, look out for unusual odors or sounds coming from within. A strong, unpleasant smell can indicate the presence of pests like small hive beetles or wax moths. You may also notice an increased level of noise, such as buzzing or chirping, which could suggest that pests are present and competing with your bees for resources.
Some common visual signs of pest infestation include damaged or distorted honeycomb cells, chewed wood, or the presence of small holes in the hive’s structure. Pests like mice or rats may also leave behind droppings or gnaw marks on nearby surfaces. Bees that are struggling to defend their hive from pests may become more aggressive and defensive, stinging when approached.
To identify pest infestation early, regularly inspect your beehive for these signs and take action promptly if you notice any issues. A small problem can quickly escalate into a major issue if left unchecked, so it’s essential to stay vigilant and monitor your hive closely throughout the inspection process.
Disease Symptoms and Prevention Strategies
Recognizing disease symptoms in a beehive is crucial for prompt treatment and prevention strategies. Fungal diseases like nosema and American foulbrood can cause bees to become lethargic, disoriented, or even die. Look for telltale signs such as loose debris on the hive floor, a sour or rotting odor, or the presence of fungal growths on the combs.
Beekeepers can take several steps to prevent disease outbreaks. First, ensure proper ventilation within the hive by checking for adequate airflow and making adjustments as needed. Regular cleaning and disinfection of equipment also helps reduce the risk of disease transmission. Monitor your bees’ nutritional intake by feeding them a balanced diet during times of scarcity or stress.
Some diseases are more common in certain regions or climates. For example, American foulbrood is prevalent in areas with high temperatures and humidity levels. Be aware of these regional factors when planning your prevention strategies. Regularly inspecting your hive for disease symptoms and taking prompt action can help maintain a healthy colony and prevent costly losses.
Nutritional Deficiencies and Supplements
Nutritional deficiencies can manifest as reduced brood growth, smaller honey stores, and decreased overall hive health. A lack of essential nutrients can be caused by a variety of factors, including inadequate foraging areas, poor pollen quality, or insufficient sugar sources. Bees may also struggle to convert nectar into honey if their digestive system is impaired.
Common nutritional deficiencies include low levels of protein, vitamins, and minerals such as calcium, iron, and manganese. When inspecting the hive, look for signs of malnutrition in the brood. Check for deformed or underdeveloped pupae, as well as an overall decrease in larval numbers. You may also notice a drop in honey production, which can be a clear indicator that your bees are not receiving all the necessary nutrients.
If you suspect nutritional deficiencies, consider supplementing with high-quality bee feed. These products typically contain a balanced mix of essential nutrients and can help bridge gaps in foraging. However, use supplements judiciously, as over-supplementation can have negative effects on hive health. Always follow manufacturer guidelines and start with small amounts to gauge your bees’ response.
Advanced Inspection Techniques
Advanced inspection techniques are essential for identifying potential issues and optimizing honey production, which is why we’ll be exploring specialized methods to enhance your inspections. This includes using magnification tools and observing for specific signs of disease and pests.
Using Specialized Equipment
Inspectors often rely on specialized equipment to perform their tasks safely and effectively. Smokers are a crucial tool for calming bees before inspection. By producing a gentle stream of smoke, smokers mask the alarm pheromones that alert bees to potential threats. This allows inspectors to approach the hive more easily without provoking an aggressive response from the bees.
A bee suit is another essential piece of equipment, protecting inspectors from stings and other potential hazards. These suits are designed with a focus on both protection and visibility, ensuring that inspectors can clearly see what they’re doing while minimizing their exposure to the bees.
When selecting a smoker or bee suit, consider factors such as durability, ease of use, and compatibility with your inspection style. Some smokers may be more fuel-efficient than others, for example, while certain bee suits may offer improved flexibility or breathability.
Monitoring for Signs of Stress and Fatigue
Inspectors should be vigilant for signs of stress and fatigue in the colony, as these can signal underlying issues that need attention. Look for bees clustering at the hive entrance during cooler periods, which may indicate a stressed colony struggling to regulate temperature. Bees often become more active at night when temperatures are lower, a behavior known as “reverse diel activity.” This can be an indication of stress or fatigue.
Monitor the brood pattern and queen activity closely. A queen that is not laying eggs regularly or consistently may indicate signs of stress or fatigue. You should also examine the overall health and appearance of the bees, watching for signs of disease or nutritional deficiencies.
In a stressed colony, you might notice an increased number of dead bees at the hive entrance. This can be due to various factors such as disease, pests, or poor nutrition. Keep in mind that some dead bees are normal, especially during times of high activity or when the colony is preparing for swarming.
When inspecting for signs of stress and fatigue, it’s essential to consider the overall health and well-being of the colony rather than just focusing on individual issues. By monitoring these key indicators, you can catch potential problems early on and take corrective action before they impact honey production.
Analyzing Brood Patterns and Hive Activity
When analyzing brood patterns and hive activity, look for evidence of a healthy balance between egg-laying and nurse bee populations. A strong brood pattern will show an even distribution of eggs and larvae across frames, with most cells containing brood at different stages of development. This indicates a robust queen presence and adequate food supply.
Pay attention to the number of sealed brood cells versus open ones; ideally, you’ll see more sealed cells than open ones. Sealed brood typically emerges in 7-10 days, so this ratio can help you estimate the age of your colony. A high proportion of emerging bees also suggests a well-functioning queen.
Look for patterns that indicate potential issues, such as:
• Excessive drone production (too many sealed cells)
• Lack of progress or slow development
• Uneven brood distribution across frames
These signs can signal problems with the queen’s age or health, inadequate nutrition, or temperature fluctuations within the hive. Monitor and record your observations to track changes over time and make informed decisions about corrective action.
Best Practices for Post-Inspection Care
After inspecting your beehive, it’s essential to implement these best practices to prevent problems and ensure a healthy colony. This includes steps for cleaning equipment and monitoring for pests.
Corrective Action and Treatment
When addressing issues found during a beehive inspection, it’s essential to take corrective action as soon as possible. This may involve treating pests or diseases with approved medications or pesticides. For example, if a hive is infested with varroa mites, the beekeeper can apply formic acid or Apivar strips to control the population. Similarly, if disease symptoms are present, such as American Foulbrood or Nosema, the affected frames should be isolated and treated with antibiotics.
Supplementing bees with necessary nutrients is also crucial. This may include adding sugar or honey to provide energy for the colony during times of scarcity. Beekeepers can also introduce probiotics to support the gut health of their bees. However, it’s essential to note that over-supplementation can harm the colony in the long run.
Beekeepers should always follow local regulations and safety guidelines when administering treatments or supplements. A general rule of thumb is to treat no more than 50% of the hive at a time to avoid stressing the remaining bees. This approach allows for effective treatment while minimizing disruption to the colony’s social hierarchy and overall health.
Ongoing Monitoring and Maintenance
After inspecting your beehive, it’s essential to continue monitoring its progress and addressing any issues that arise. This ongoing process is crucial for maintaining optimal honey production and ensuring the health of your colony.
You should regularly check on your hive’s temperature, humidity levels, and weight to gauge its overall condition. A small change in these factors can have a significant impact on your bees’ productivity. For instance, if the temperature fluctuates significantly or the humidity is too high, it may lead to an increase in pests or diseases.
To maintain optimal conditions, ensure that your hive has adequate ventilation and is situated in a spot with plenty of sunlight. Also, make sure to provide enough food and water for your bees throughout the year. Regularly inspecting the hive’s entrance and cleaning it as needed will also help prevent pest infestations.
Some key factors to monitor include:
- Hive weight: Check weekly to ensure the colony is growing and storing honey efficiently
- Queen activity: Monitor her movement and egg-laying patterns to identify potential issues
- Brood patterns: Regularly inspect for signs of disease or pests that may be affecting brood growth
By maintaining a proactive approach, you can prevent problems before they become serious and optimize your honey production.
Frequently Asked Questions
What If I Notice Signs of Pest Infestation After Inspection?
Yes, it’s essential to take immediate action if you notice signs of pest infestation. This can include using integrated pest management techniques, such as introducing natural predators or modifying the hive environment to discourage pests. Regularly monitoring the hive and addressing issues promptly will help prevent severe infestations.
Can I Use the Same Equipment for Multiple Hives?
While it’s convenient to share equipment among multiple hives, it’s crucial to ensure that each piece of gear is thoroughly cleaned and disinfected between uses. This helps prevent cross-contamination of pests, diseases, or other issues between colonies. Consider labeling your equipment with hive-specific information to avoid confusion.
How Do I Determine the Optimal Frequency for Inspections?
The frequency of inspections depends on various factors, including the age and health of your colony, environmental conditions, and local regulations. As a general rule, inspect hives every 7-10 days during peak honey production periods and less frequently during slower seasons. Be prepared to adjust your inspection schedule as needed based on changing circumstances.
What If I’m New to Beekeeping and Don’t Know Where to Start?
Don’t worry if you’re new to beekeeping! Begin by reviewing local regulations, guidelines for safe bee handling practices, and recommended equipment lists. Practice inspecting a healthy hive under the guidance of an experienced mentor or join online forums to connect with other beekeepers who can offer valuable advice.
Can I Use Advanced Inspection Techniques Without Prior Experience?
While it’s possible to learn advanced inspection techniques, such as using specialized equipment or analyzing brood patterns, prior experience and knowledge are essential for effectively applying these methods. Start by mastering the basics of hive inspection, then gradually build your skills through practice and mentorship.
