Planting an avocado seed is a simple and rewarding process that can yield a delicious homegrown fruit tree. Many people are unaware, however, that not all avocado seeds have the potential to grow into healthy trees, and even fewer know how to properly care for their young seedlings. This can lead to disappointment and frustration down the line. You may be interested in growing your own avocado tree from scratch, but you’re unsure where to start or what common mistakes to avoid. In this article, we’ll walk you through the step-by-step process of planting an avocado seed, from preparation to harvesting, and provide expert tips on how to ensure a successful outcome. By the end of this guide, you’ll know exactly how to plant and care for your own avocado seedling.
Choosing the Right Materials
Choosing the right materials is crucial for a successful avocado seed planting, so let’s focus on selecting the best potting mix and tools for your little sapling.
Preparing the Avocado Seed
To plant an avocado seed successfully, you’ll first need to remove it from the fruit. Choose a ripe avocado and carefully twist the two halves apart. Locate the large pit in the center of each half and gently lift it out with your fingers or a spoon. Once you have the pit, inspect it for any visible signs of damage or mold – if it’s damaged, it may not germinate.
For optimal results, select a healthy, plump seed with no cracks or soft spots. A plump seed indicates that it has been properly nourished by the avocado and will be more likely to sprout. Look for seeds that are roughly 1-2 inches in length – these tend to produce healthier trees.
Next, wash the seed gently under cold running water to remove any remaining fruit pulp or oils. Pat the seed dry with a paper towel to prevent fungal growth. This simple preparation step helps create an environment conducive to germination and sets your seedling up for success. By selecting a healthy seed and properly preparing it for planting, you’ll be well on your way to growing a thriving avocado tree.
Selecting the Perfect Container
When selecting a container for planting your avocado seed, you’ll want to prioritize ones with good drainage and adequate size. A pot or planter made from breathable materials like terra cotta, ceramic, or wood is ideal, as they allow excess moisture to escape, reducing the risk of root rot.
Avoid using plastic containers, which can trap water and create an environment conducive to fungal growth. Instead, opt for a container with drainage holes in the bottom or sides to ensure excess water can flow out freely.
A seed starting tray is also a suitable option, as it provides individual cells for each seed, making it easier to transplant them once they’ve germinated. When choosing a size, consider that avocado seeds require room to grow their roots and develop a robust root system.
For the first few weeks, a small container (around 6-8 inches deep) will suffice, but as your seedling grows, you’ll need to transfer it to a larger pot with more room for its roots. A good rule of thumb is to choose a container that’s at least twice as wide and deep as the original one.
Preparing the Seedling Environment
To plant an avocado seed successfully, it’s crucial that you create a suitable environment for your seedling to thrive. Here, we’ll cover the essential steps to prepare the perfect conditions.
Watering and Humidity
Watering and humidity are crucial factors for avocado seedling growth. Overwatering can be detrimental to young seedlings, causing root rot and other issues. To avoid this, water your seedling sparingly at first, allowing the top inch of soil to dry out between waterings.
As a general rule, water your avocado seedling when the top 1-2 inches of soil feel dry to the touch. Start with once a week, then adjust based on environmental conditions. For example, if you live in a hot and dry climate, you may need to water every 3-4 days, while cooler temperatures allow for less frequent watering.
Maintaining humidity is also essential for avocado seedlings. You can increase humidity around your seedling by placing the pot on a tray filled with water and pebbles or using a humidifier nearby. This helps prevent moisture loss through transpiration and promotes healthy growth.
Aim to maintain relative humidity between 40-60%. Most indoor spaces fall within this range, but if you live in an arid climate, consider investing in a humidifier specifically designed for plants. Remember that avocado seedlings prefer high humidity during their first few weeks after germination.
Providing Adequate Light
Avocado seedlings require bright light to photosynthesize and grow. While direct sunlight is ideal, it’s not always feasible for indoor growers. In such cases, alternative light sources like grow lights or fluorescent lighting can be effective.
Grow lights emit a high intensity of light, typically in the blue spectrum, which promotes healthy growth. They come in various forms, including LED, HPS (high-pressure sodium), and CFL (compact fluorescent). For avocado seedlings, look for a grow light with a PAR (photosynthetic active radiation) rating of at least 200-300 μmol/s.
Fluorescent lighting is another option, offering a softer spectrum than grow lights. T5 or T8 fluorescent tubes are suitable for seedling growth and can be placed 6-12 inches above the soil surface.
When choosing a light source, consider the ideal light intensity for avocado seedlings: around 10-14 hours of direct sunlight or 18-24 hours of indirect light per day. This promotes healthy root development, leaf growth, and overall plant vigor. Keep in mind that too little light can lead to weak and leggy plants, while excessive light can cause scorching or burning.
Sowing the Seed
First, you’ll need to prepare your avocado seed for planting by carefully washing it and removing any excess skin. This simple step sets the stage for a healthy root system.
Planting Methods
Planting avocado seeds can be done using various methods, each with its own set of advantages and disadvantages. The most common approach is to plant the seed directly into a potting mix. This method allows for easy monitoring of moisture levels and prevents root rot that can occur when waterlogged soil.
Another popular technique is the paper towel method, where you wrap the seed in a damp paper towel and place it in a plastic bag or container. This method helps maintain high humidity and can promote germination in as little as 3-5 days. However, be cautious not to overwater, as this can lead to mold growth.
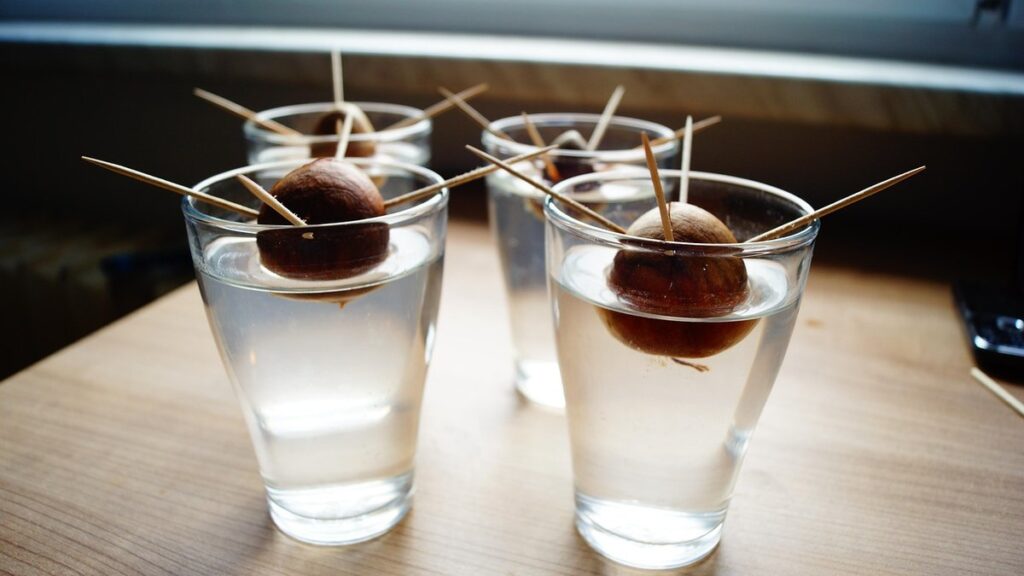
The water glass technique is also effective, where you place the seed in a glass of water with the pointed end submerged and the wide end above the waterline. As roots develop, they will be visible through the glass, indicating readiness for transplanting into potting mix. This method requires minimal equipment and can be an attractive option for beginners.
It’s essential to note that all three methods require consistent moisture levels and temperatures between 65-75°F (18-24°C) for optimal germination.
Avoiding Common Mistakes
Over-watering and under-watering are two common mistakes that can significantly impact the success of sowing an avocado seed. When you water the seed too frequently, the soil becomes waterlogged, causing the seed to rot. On the other hand, insufficient watering causes the seed to dry out, making it difficult for the root system to develop.
Inadequate light exposure is another critical error to avoid. Avocado seeds require bright, indirect light to undergo photosynthesis and grow. Placing them in a spot with too little natural light will slow down their growth or even lead to root death.
To avoid these mistakes, water your seed sparingly at first, allowing the top inch of soil to dry out between each watering. As the seedling grows, gradually increase the frequency of watering. Make sure it’s placed near an east- or west-facing window with filtered sunlight, and consider supplementing with grow lights if necessary.
Check the soil moisture daily by gently sticking your finger into the soil up to the first knuckle. If it feels dry, water thoroughly; if not, wait another day. Remember that avocado seeds are sensitive to over-watering, so err on the side of caution until you observe root growth and leaf development.
Seedling Care and Maintenance
Now that you’ve successfully planted your avocado seed, it’s time to focus on giving it a strong foundation through proper care and maintenance. This involves ensuring optimal conditions for growth.
Transferring to a Larger Pot
When transferring your avocado seedling to a larger pot, it’s essential to handle it with care. Over-manipulation can cause shock and even lead to root loss. To minimize disruption, gently slide the seedling out of its original container, taking note of the soil mass intact. If stuck, run a soft-bristled brush or your fingers around the edges to loosen the soil.
Next, inspect the roots for any circling or tangling. Use your fingers or a blunt tool to carefully tease them apart without causing excessive damage. This step is crucial in preventing root bound conditions that can hinder healthy growth.
Once freed from its original container, place the seedling in the new pot at the same depth as before. Add fresh, well-draining soil around the roots, taking care not to compact it excessively. Water gently but thoroughly after transplanting to settle the soil and prevent drying out.
Fertilization and Pruning
Fertilizing avocado seedlings provides essential nutrients for healthy growth and development. Start with a balanced, water-soluble fertilizer (20-20-20) when your seedling has 2-3 sets of leaves. Dilute the fertilizer to half the recommended strength to avoid burning the roots. You can also use a fertilizer specifically formulated for indoor plants or those rich in calcium and magnesium.
Timing is crucial; fertilize every 1-2 weeks during the first few months, then gradually reduce frequency as your seedling matures. Over-fertilization can lead to weak growth and reduced fruit production. Keep an eye on your seedling’s response to fertilization, adjusting the frequency or type of fertilizer as needed.
Pruning avocado seedlings encourages a strong, balanced structure and promotes fruiting. Remove lower leaves that touch the soil to prevent disease and encourage a single stem. Cut back any leggy growth by one-third to one-half, making clean cuts just above a node (where a leaf meets the stem). Prune your seedling when it reaches 6-8 inches tall to control its shape and direct energy towards fruit production.
Overcoming Challenges
Planting an avocado seed can be a rewarding experience, but it also comes with its own set of challenges. Let’s tackle some common obstacles that might arise during the process.
Common Problems and Solutions
As avocado seedlings grow, they can be susceptible to various problems that may hinder their development. One common issue is root rot, often caused by overwatering. To prevent this, ensure good drainage by using a well-draining potting mix and avoiding waterlogging. If you notice yellowing leaves or a soft, mushy stem, it’s likely due to excess moisture. Remove any affected areas, and repot the seedling in fresh soil.
Pests like spider mites, mealybugs, and scale can also infest your avocado plant. Check for these tiny insects on the undersides of leaves and stems. To control an infestation, quarantine the affected plant, and treat it with insecticidal soap or neem oil according to the product’s instructions. Regularly inspect your seedling, and take action promptly if you notice any signs of pest activity.
Nutrient deficiencies can also impact avocado growth. If your seedling is not receiving enough nutrients, it may display symptoms like stunted growth, yellowing leaves, or a lack of new leaf development. To address this issue, use a balanced fertilizer (20-20-20) during the growing season. Dilute the recommended amount to half strength for the first few weeks after transplanting.
Some diseases like root rot and leaf spot can be more challenging to manage. If you suspect your seedling has contracted a disease, consult with a local nursery or gardening expert for guidance on treatment options. Regularly inspect your plant’s roots and remove any damaged areas to prevent the spread of infection.
To maintain a healthy avocado plant, keep an eye out for these common problems and address them promptly. By recognizing potential issues early on and taking corrective action, you can ensure your seedling thrives and develops into a robust, productive tree.
Harvesting Avocado Fruit
Once you’ve successfully germinated and grown your avocado seedling, it’s time to focus on harvesting the fruit. This process requires some patience and care to ensure a bountiful yield.
Identifying Maturity
A mature avocado fruit typically displays a range of changes. The skin color deepens from its initial pale green to a rich, dark green or nearly black hue. Some varieties may develop a subtle yellow or red tint as they ripen. In terms of texture, the fruit becomes slightly soft to the touch, but still firm enough to maintain its shape.
Another key indicator is weight: ripe avocados are significantly heavier than unripe ones due to their increased water content. It’s essential to inspect multiple fruits and choose the one that best fits these criteria. Harvesting too early can result in poor flavor and lower nutritional value.
When checking for ripeness, gently squeeze the fruit around the stem; a slight yield indicates readiness. Be cautious not to squeeze too hard, as this can damage the skin. Ripe avocados typically have a slight give when pressed near the stem but still feel firm overall. By recognizing these signs of maturity and timing your harvest accordingly, you’ll be able to enjoy optimal flavor and nutritional value from your homegrown avocado fruit.
Harvesting Techniques
When harvesting avocado fruit from a tree grown from a seed you planted, consider several factors to ensure safe and effective harvesting. Begin by checking the branch strength: carefully inspect the stem attaching the fruit to the tree, ensuring it can support the weight of the fruit without breaking.
Look for avocados that have reached full size but still feel slightly soft to the touch; this is a good indication of ripeness. Gently twist and pull on the fruit, checking if it comes away from the tree easily. If not, wait a few more days or try gently rocking the fruit back and forth.
When harvesting, use a clean pair of pruning shears or scissors to cut the stem about an inch above the fruit. This will help prevent damage to the tree and promote healthy growth. Harvest avocados at different stages of ripeness for optimal flavor and texture: pick them when slightly underripe for guacamole, or wait until they’re fully ripe for eating fresh.
Some varieties may require more care than others; Hass avocados, for example, tend to fall from the tree easily when ripe.
Frequently Asked Questions
Can I Plant Multiple Avocado Seeds at the Same Time?
Yes, it’s perfectly fine to plant multiple avocado seeds simultaneously, especially if you’re new to growing them. This way, you can compare growth rates and experiment with different techniques without having to wait for each seedling to mature.
How Long Does It Take for an Avocado Tree to Bear Fruit After Planting the Seed?
Avocado trees typically take 3-5 years to produce fruit after planting the seed, but this timeframe can vary depending on factors such as climate, soil quality, and pruning practices. With proper care and patience, you may see your tree producing flowers and eventually fruit within a few years.
What If I Notice Yellow or Brown Spots on My Avocado Seedling’s Leaves?
Yellow or brown spots on avocado seedlings are often indicative of over-watering or root rot. Check the drainage holes in your container to ensure excess water isn’t accumulating, and consider repotting the seedling with fresh, well-draining potting mix.
Can I Grow an Avocado Tree Indoors Year-Round Using Artificial Lighting?
Yes, it’s possible to grow an avocado tree indoors using artificial lighting. However, you’ll need to provide supplemental lighting that mimics natural sunlight (around 12-14 hours of light per day) and maintain a temperature between 65°F-75°F (18°C-24°C). Monitor your tree’s growth and adjust the lighting schedule as needed to prevent burning or stunted growth.
Will an Avocado Tree Continue to Produce Fruit After Being Transplanted to a Larger Pot?
Transplanting an avocado tree into a larger pot can actually promote fruit production, as it allows for more root development and better access to nutrients. However, be cautious not to shock the tree during transplanting, and make sure to handle the roots gently to minimize stress.

