Extracting honey from comb is an art that requires patience, skill, and attention to detail. You’ve worked tirelessly to create this precious resource, but now you’re faced with the challenge of extracting it without compromising its quality or wasting any of its potential. Whether you’re a seasoned beekeeper or just starting out, learning how to extract honey from comb is an essential step in harvesting your crop.
As you prepare for extraction, you’ll need to consider factors such as the moisture content of the honey and the condition of the combs. This guide will walk you through various methods and techniques for extracting honey using centrifuges, crush and strain methods, and more. By the end of this article, you’ll be equipped with the knowledge and skills needed to extract high-quality honey from your comb, preserving its unique flavor and nutritional profile.
Understanding Beekeeping and Honeycomb
To successfully extract honey from comb, it’s essential to have a solid understanding of bee behavior, honey production, and the structure of the hive. This includes knowing how bees build their complex honeycombs.
What is Honeycomb?
Honeycomb is a wax structure created by honeybees to store honey and pollen. Its unique hexagonal cells provide an optimal environment for bees to thrive, with each cell specifically designed to hold a precise amount of nectar or pollen. The hexagonal shape allows for maximum storage capacity while minimizing the use of wax, making it an efficient structure.
The hexagonal cells are made up of two main components: the upper wall and the lower floor. The upper wall is typically thicker than the lower floor, providing additional support to the cell’s contents. This structural integrity is crucial in maintaining the comb’s stability during extraction.
Bees build honeycomb by secreting wax from their own bodies and manipulating it into the characteristic hexagonal shape. The process requires precise temperature control and humidity levels, which is why bees often prefer to build combs within the hive itself. Understanding the structure and purpose of honeycomb is essential for beekeepers, as it helps them identify high-quality comb suitable for extraction.
Types of Honeycombs
European and Langstroth honeycombs are the two primary types used by beekeepers. European honeycombs have a hexagonal pattern with slightly rounded cells, whereas Langstroth combs feature a more angular, rectangular cell structure. The differences between these two types affect how they perform in extracting honey. European combs can be challenging to extract from due to their smooth surface and tight cell walls. Beekeepers often use specialized equipment or techniques to avoid damaging the comb when working with this type.
In contrast, Langstroth combs have a more open structure that makes them easier to extract from. Their rectangular cells allow for better airflow, which can help prevent moisture buildup and make the extraction process smoother. When choosing between these two types of honeycombs, beekeepers should consider their specific needs and preferences.
When extracting honey from either type of comb, it’s essential to understand how the cell structure will impact the process. This knowledge helps beekeepers prepare for potential challenges and choose the best methods for their equipment.
The Importance of Quality Honeycomb
Quality honeycomb is a crucial component in producing high-quality honey. The purity of the wax used to create the comb plays a significant role in determining the final product’s quality. Beeswax, for instance, is a natural and non-toxic material that provides a clean canvas for bees to store their nectar. On the other hand, using synthetic waxes or impure beeswax can introduce contaminants into the honey.
The health of the bees is another essential factor in producing quality honeycomb. Bees that are healthy and free from diseases are more likely to produce wax with desirable properties. This includes a higher percentage of unsaturated fatty acids, which contribute to the comb’s flexibility and strength.
Proper storage conditions also impact the quality of the honeycomb. Excessive moisture, temperature fluctuations, or exposure to pests can compromise the integrity of the wax and introduce contaminants into the honey. To ensure quality, beekeepers should maintain a clean and stable environment for their bees, including proper ventilation and pest control measures. This attention to detail will ultimately result in high-quality honeycomb that yields a superior final product.
Harvesting and Preparing the Honeycomb
Now that you’ve removed the honey from the frames, it’s time to carefully extract the remaining liquid gold from the comb itself. This delicate process requires attention to detail and a gentle touch.
When to Harvest the Honeycomb
Harvesting honeycomb when the nectar flow is slowing down or has stopped allows you to capture a full crop of honey before the bees need it for winter stores. This usually occurs in late summer or early fall, depending on your location and climate.
As a general rule, you can start checking the hive around mid-to-late August for signs that the nectar flow is slowing down. One indicator is the presence of pollen grains in the honeycomb cells. Bees tend to store more pollen when preparing for winter, which indicates a decrease in nectar availability.
Another sign is the reduction in new honeycomb construction. As the nectar flow slows, bees focus on ripening existing nectar stores and repairing damaged comb rather than building new structures. Check the hive regularly during this period to determine the optimal harvesting time.
It’s essential to harvest before the winter nectar flow, which can be unpredictable and often yields poor-quality honey. Harvesting too early may result in a lighter-colored or less-flavored honey, as some of the sugars have not yet been fully converted by the bees. Wait until the bees have completed their main nectar collection, ensuring you’re extracting a high-quality crop of honey.
Removing the Frames from the Hive
When removing frames from the hive, beekeepers must exercise care to minimize disruption to the bees and prevent damage to the comb. To accomplish this, specialized tools are used to gently release the frames from their slots within the hive. One such tool is the frame grip or puller, which allows for a secure hold on the frame while minimizing pressure on the surrounding honeycomb.
The goal is to remove the frames as intact as possible, preserving the delicate comb and its precious cargo of honey. To achieve this, beekeepers must work methodically and carefully, taking their time to ensure each frame is extracted without causing unnecessary stress to the bees or compromising the structural integrity of the comb.
In practice, removing the frames from the hive typically occurs during the extraction process, after which they are taken to a separate area for cleaning and preparation. The precision and attention to detail required at this stage cannot be overstated: damaged comb can compromise the quality and quantity of honey extracted, while disrupting the bees’ natural activities can have long-term consequences for the colony’s health and productivity.
Cleaning and Inspecting the Honeycomb
Inspect the honeycomb for signs of pests like small hive beetles, wax moths, or mice. Look for debris, mold, or mildew on the frames or comb. Remove any damaged or infested frames to prevent contamination during extraction.
Use a soft-bristled brush or a specialized cleaning tool to gently remove excess wax and propolis from the frames. This helps prevent clogging in the extractor and ensures a smooth extraction process. For tougher buildup, mix baking soda and water to create a paste that can be applied directly to the affected area.
Inspect each frame closely for signs of disease like American Foulbrood or European Foulbrood. Check for any unusual odors, discoloration, or patterns on the comb. If you’re unsure about the health of your bees or the honeycomb, consult with a local beekeeping expert or inspect the frames under a microscope.
Before extracting, ensure all the frames are free from debris and pests, and the comb is clean and intact. This critical step ensures the quality of the honey and prevents contamination during processing.
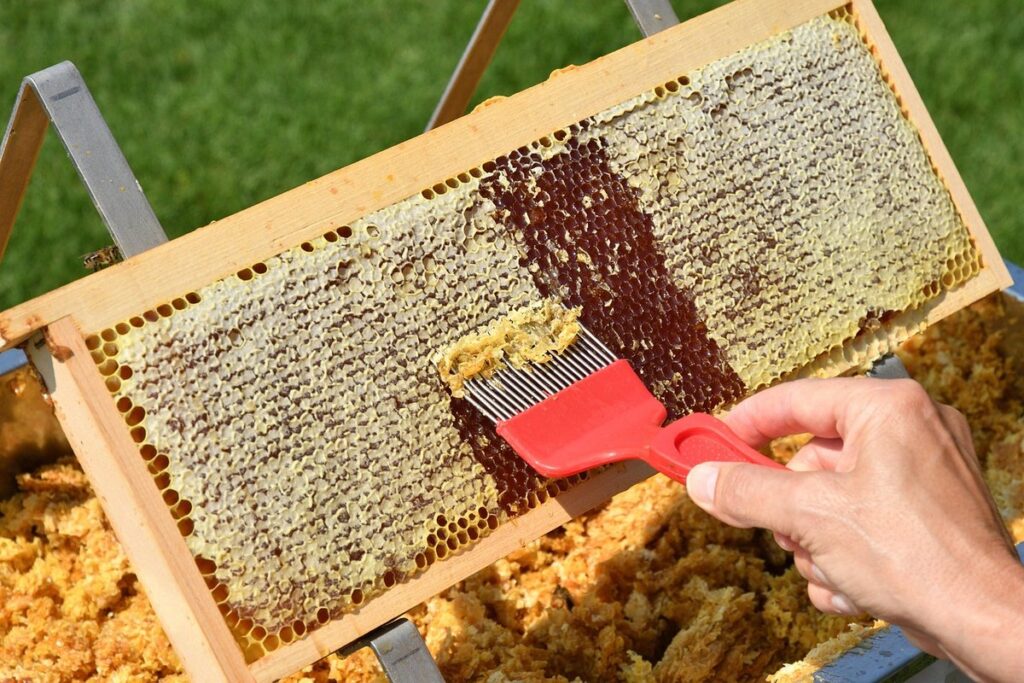
Extracting the Honey
Now that you’ve harvested your honeycomb, it’s time to extract the golden nectar within. In this next step, we’ll walk through the process of releasing the honey from its wax cells.
Methods for Extracting Honey
Centrifugal extractors are a popular choice for extracting honey due to their efficiency and ease of use. They work by spinning the honeycomb at high speed, causing the honey to be flung out of the comb and collected in a container. This method is particularly useful when working with large quantities of honey.
The crush-and-strain method involves physically crushing the honeycomb to release the honey, which is then strained through a fine-mesh filter to remove any debris or wax particles. This method is often preferred for its simplicity and low cost, but it can be more labor-intensive than centrifugal extraction.
Cold extraction, on the other hand, involves extracting honey at a cooler temperature, typically between 50°F and 60°F (10°C to 15°C). This method helps preserve the natural enzymes and flavor of the honey, resulting in a higher-quality product. It’s often used for producing artisanal or specialty honeys.
Beekeepers should consider their specific needs and circumstances when choosing an extraction method. For example, those with limited space may prefer crush-and-strain, while those prioritizing efficiency might opt for centrifugal extraction.
Setting Up the Extractor
To set up the extractor correctly, follow the manufacturer’s instructions carefully. Begin by assembling the machine according to the provided guidelines. This may involve attaching various components such as the motor unit, centrifuge drum, and frame holder.
Next, attach the frames containing the honeycomb to the extractor’s frame holder. Ensure that the frames are securely fastened using clips or screws, depending on the type of extractor you’re using. A common mistake is over-tightening the clips, which can damage the frames or even cause them to break apart during extraction.
Check the manufacturer’s manual for specific guidance on assembling and setting up your particular model of extractor. Some extractors may require additional steps or precautions, such as pre-assembling certain parts before use.
Before turning on the extractor, double-check that all parts are securely attached and the machine is properly balanced. This will help prevent vibration and ensure a smooth extraction process. Consult the manufacturer’s instructions for specific recommendations on pre-extraction checks.
Operating the Extractor
To operate the extractor, start by turning it on and allowing it to extract the honey from the frames. Typically, you’ll begin with a slow speed setting and gradually increase as needed. Monitor the process closely for any issues, such as excessive foam or stuck frames.
When operating the extractor, make sure to keep an eye on the temperature gauge, as high temperatures can damage the honey or cause it to crystallize. A good rule of thumb is to maintain a consistent temperature between 60°F and 70°F (15°C and 21°C). You may also want to consider investing in a thermometer specifically designed for extractors.
Additionally, be aware of the extractor’s centrifugal force setting. This will vary depending on the type of frames you’re using and the desired level of honey extraction. Typically, you’ll start with a low setting (around 500-700 RPM) and adjust as needed to achieve optimal results.
It’s essential to follow the manufacturer’s guidelines for operating your specific extractor model, as some may have unique features or requirements.
Filtering and Bottling the Honey
Now that you’ve extracted the honey from the comb, it’s time to refine it into a smooth, pourable liquid. This process involves filtering out any remaining wax particles and debris.
Why Filter the Honey?
Filtering the honey is a crucial step in ensuring its quality and consistency. When raw honey is extracted from the comb, it often contains impurities like wax fragments, bee parts, and excess moisture. These impurities can affect the texture and flavor of the honey, making it unpleasant to consume.
If you don’t filter your honey, you may end up with a cloudy or grainy liquid that’s difficult to bottle. This is especially true for coarse filters, which remove larger particles like wax and debris. Fine filters, on the other hand, can catch tiny impurities like pollen grains and bee wings, resulting in a smoother, more refined product.
Beekeepers use different types of filters depending on their needs and preferences. Some may prefer to use a combination of coarse and fine filters for optimal results. It’s essential to choose the right filter type for your specific situation, taking into account factors like the honey’s moisture content and your desired level of filtration. By filtering your honey effectively, you can produce a high-quality product that’s free from impurities and ready for bottling.
Bottling the Honey
When bottling the honey, beekeepers need to ensure that it’s packaged safely and compliant with local regulations. This involves filling clean glass bottles with the filtered honey. It’s essential to use new containers each time you bottle honey to prevent contamination. Typically, a 1-ounce or 30-milliliter container is ideal for single-serving sizes.
Labeling is also crucial as it not only adheres to regulatory requirements but also provides vital information about the product for consumers. This includes details such as the type of honey (e.g., clover, manuka), net weight, and any relevant certifications (e.g., organic, non-GMO). Some beekeepers choose to include a ‘best before’ date or storage instructions on their labels.
It’s worth noting that labeling can vary depending on your target market. For instance, if you’re selling locally, you might need to comply with different regulations compared to those exporting internationally. Be sure to research and familiarize yourself with the relevant standards in your area.
Advanced Techniques for Extracting Honey
Once you’ve mastered the basics, it’s time to take your honey extraction skills to the next level and learn advanced techniques that will yield even more golden goodness from each frame.
Cold Extraction
Cold extraction is a method of honey extraction that preserves the natural enzymes and nutrients found in the honey. This process requires specialized equipment and strict protocols to ensure success.
To begin cold extraction, beekeepers must first prepare their extractor by ensuring it’s at room temperature and free from any contaminants. The honeycomb frames are then gently placed into the extractor, where they’re spun to extract the honey without heat or agitation. This process can be time-consuming, but it yields a high-quality honey that retains its natural properties.
A key aspect of cold extraction is maintaining a consistent temperature throughout the process. Beekeepers must ensure their extractor and surrounding environment are at a stable temperature, typically between 60°F to 70°F (15°C to 21°C). This helps prevent the breakdown of enzymes and the degradation of nutrients that can occur when honey is exposed to heat.
To achieve optimal results with cold extraction, beekeepers should also follow these guidelines:
- Use an extractor designed specifically for cold extraction
- Maintain a consistent spin speed
- Monitor temperature levels closely
- Avoid over-processing or agitation of the honey
Using Enzymes to Aid Extraction
When using enzymes to aid extraction, beekeepers typically employ a specific type of enzyme called diastase. This enzyme breaks down the complex wax molecules into simpler compounds, making it easier for the honey to flow out of the comb. However, not all combs require enzymatic treatment; fresh, intact combs usually don’t need this extra help.
For damaged or old combs, using enzymes can be a game-changer. The enzyme is applied to the comb and left to sit for a specified period, allowing it to break down the wax. This process typically takes around 10-30 minutes, depending on the concentration of the enzyme and the condition of the comb.
To apply enzymes effectively, beekeepers should follow the manufacturer’s instructions carefully. It’s also essential to choose an enzyme specifically designed for honey extraction, as some products may not work well with wax or could contaminate the honey. By incorporating enzymatic treatment into their extraction process, beekeepers can streamline their operations and extract more honey from damaged combs.
FAQs and Best Practices for Extracting Honey
You’ve got questions, we’ve got answers! Below, we’ll address common concerns and share expert tips to ensure your honey extraction process is smooth and successful every time.
Common Questions Answered
When should I harvest honeycomb for optimal extraction? The frequency of harvesting depends on several factors, including the strength of the colony and the nectar flow. As a general rule, beekeepers typically harvest when there are 10-15 pounds of excess honey per frame. Harvesting too early can leave bees without enough stores for winter, while delaying too long can result in fermented or crystallized honey. It’s essential to inspect the frames regularly and monitor the colony’s strength before deciding on a harvest date.
What equipment do I need to extract honey? The basic setup consists of an extractor, which can be manual or electric, and frames to hold the comb. Some beekeepers also use a centrifugal separator for clearer honey. If you’re new to extracting, consider starting with a manual extractor as they are generally easier to clean and maintain.
What if my honey is crystallized or has sediment? This can occur when water content is high or if the honey hasn’t been filtered properly. To correct this issue, gently warm the honey in a double boiler or by placing the container in a pan of hot water. Avoid using direct heat as it can burn the honey.
Best Practices for Extracting Honey
When extracting honey, beekeepers must prioritize their safety and the health of their bees. This begins with wearing protective gear, including a veil to shield against stings, gloves to prevent direct contact with the comb, and a beekeeping suit to cover exposed skin. Regularly cleaning and sanitizing equipment is also crucial to prevent contamination and ensure the quality of the honey.
Maintaining cleanliness throughout the extraction process is essential for producing high-quality honey and preventing disease in your bees. This includes regularly inspecting the hive and frames for signs of pests or diseases, such as American Foulbrood or Varroa mites, which can be detrimental to your colony’s health.
Monitoring the health of your bees during the extraction process involves checking their behavior, brood patterns, and nutritional stores. Keep an eye out for any changes in these areas, as they may indicate underlying issues that need attention. Regular monitoring will help you identify potential problems early on, allowing you to take corrective action before it’s too late.
By following these best practices, beekeepers can minimize risks to themselves and their bees while producing high-quality honey.
Frequently Asked Questions
How often should I extract honey to avoid damaging the comb?
Extracting honey too frequently can weaken the comb and harm the bees. As a general rule, it’s best to extract honey every 5-7 years or when the nectar flow is slowing down. This allows the bees to rebuild and strengthen their combs.
Can I use a centrifugal extractor for old or damaged combs?
Yes, you can use a centrifugal extractor for old or damaged combs, but it may require more force and patience. The machine might not extract as much honey, so be prepared for a lower yield. Consider using enzymes to aid extraction in these cases.
How do I know if my honey has been filtered correctly?
If your honey is cloudy or has visible particles after filtering, it’s likely that the filter wasn’t fine enough. Use a coarse filter first and then switch to a finer one for better results. Remember to monitor the temperature and consistency of the honey during filtering.
What if I notice signs of pests or diseases in my honeycomb? Can I still extract the honey?
No, if you notice signs of pests or diseases in your honeycomb, it’s best not to extract the honey. Instead, take steps to treat the infestation or disease before proceeding with extraction. This will ensure the quality and safety of your final product.
How do I store my extracted honey to preserve its natural enzymes and nutrients?
To preserve the natural enzymes and nutrients in your honey, store it in a cool, dark place away from direct sunlight. Avoid storing it near heat sources or in areas prone to moisture. Use glass containers with tight-fitting lids to prevent air exposure.

