You’ve probably heard of root cellars as old-fashioned storage spaces for fresh produce, but their benefits go far beyond just preserving fruits and vegetables. A well-designed root cellar can save you money on groceries by allowing you to store your harvest year-round, reducing the need for expensive imported produce during winter months. By learning how to build an energy-efficient root cellar, you’ll not only be reducing food waste but also having access to fresh, locally grown produce even when it’s out of season. In this article, we’ll walk through the process of designing and building a functional root cellar that fits your specific needs, covering topics such as insulation, ventilation, and storage space planning, so by the end of it, you’ll be able to design and maintain your own energy-efficient root cellar for storing fresh produce all year round.
Understanding the Basics of a Root Cellar
A root cellar is essentially a simple, underground storage space designed to maintain a consistent temperature and humidity level for optimal food preservation. Let’s start by understanding its basic components and functions.
What is a Root Cellar?
A root cellar is an underground storage space designed to keep vegetables, fruits, and other perishable items fresh for longer periods. The concept of a root cellar dates back centuries, with evidence of underground storage spaces found in ancient civilizations such as the Egyptians, Greeks, and Romans. These early root cellars were often simple holes dug into the ground, lined with straw or other insulating materials.
The primary purpose of a root cellar is to maintain a consistent temperature between 32°F and 40°F (0°C and 4°C), which slows down the ripening process and preserves the quality of stored produce. Root cellars can also regulate humidity levels, keeping the air moist but not damp. This controlled environment allows for longer storage periods, typically from several months to a year or more, depending on the item.
In modern times, root cellars have evolved to incorporate advanced features such as ventilation systems and insulation materials like foam board or straw bales. Regardless of the design, the fundamental principle remains the same: by providing a stable environment, root cellars enable gardeners to enjoy their harvest year-round while minimizing food waste.
Benefits of Having a Root Cellar
Having a root cellar offers numerous benefits for homeowners who want to preserve food, reduce energy consumption, and save money. One of the primary advantages is energy efficiency. By storing vegetables and fruits at a consistent temperature between 32°F and 40°F (0°C to 4°C), you can keep them fresh for longer periods without relying on refrigeration or freezing units. This reduces your reliance on electricity, which in turn saves you money on utility bills.
Another significant benefit is food preservation. A root cellar provides an optimal environment for storing vegetables, allowing them to last up to several months beyond their typical shelf life. This means you can enjoy homegrown produce year-round without having to worry about spoilage or waste. For example, carrots stored in a root cellar can remain fresh for 6-8 months, while potatoes can last up to 10 months.
In terms of cost savings, a root cellar can help you reduce your grocery bills by providing a steady supply of fresh produce. By storing your own fruits and vegetables, you can save money on supermarket purchases and enjoy the satisfaction of eating homegrown food.
Designing Your Ideal Root Cellar
When planning a root cellar, it’s essential to consider its size, layout, and features to create a space that perfectly suits your needs and storage goals. Let’s take a closer look at designing the perfect space for storing your harvest.
Choosing the Perfect Location for Your Root Cellar
When choosing the perfect location for your root cellar, consider three crucial factors: sunlight, drainage, and accessibility. Sunlight is the enemy of a well-stored root cellar, as it can cause vegetables to spoil quickly. Ideally, select a spot that receives no direct sunlight or at most, dappled shade. This will help maintain a consistent temperature between 32°F and 40°F (0°C and 4°C), essential for preserving your harvest.
Drainage is also vital, as excess moisture can lead to mold and mildew growth. Ensure the site slopes away from your root cellar to prevent water accumulation. A slight incline of about 1-2% will allow rainwater to run off without pooling around the structure.
Accessibility is another key consideration. Position your root cellar near a main entrance or an easily accessible path, making it simple to transport produce and supplies. Avoid sites with heavy tree cover, as this can create maintenance issues and limit natural light penetration. A well-chosen location will set the stage for a successful root cellar, providing optimal conditions for storing and preserving your harvest.
Planning the Size and Layout of Your Root Cellar
When determining the ideal size and layout of your root cellar, consider your specific needs and available space. Start by assessing the types and quantities of produce you plan to store. A general rule of thumb is to allow about 10-15 square feet per person for storage space. If you have a small family or only plan to store vegetables, you may be able to get away with a smaller size.
Consider the shape of your root cellar as well. A rectangular shape can provide more efficient use of space and make it easier to navigate. You’ll also want to think about shelving and storage systems. Floating shelves are ideal for storing produce that won’t be disturbed, while movable crates or bins allow for easy access and can help keep items from getting damaged.
Remember to leave enough space for air circulation and easy movement through the cellar. A narrow aisle (about 3-4 feet wide) will make it easier to move equipment and supplies in and out of the root cellar. Think about how you’ll use the space and plan accordingly. For example, if you have a lot of long storage containers, consider placing them along the longest wall to maximize vertical space.
Building a Root Cellar: A Step-by-Step Guide
Now that you’ve chosen the perfect location for your root cellar, it’s time to start building! This step-by-step guide will walk you through each crucial stage of construction.
Excavating and Digging the Trench
When excavating and digging the trench for your root cellar, safety should be your top priority. Wear protective gear such as a hard hat, gloves, and sturdy boots to prevent injuries from falling rocks or equipment mishaps. Make sure the area is clear of any obstacles and that you have a stable and level surface to work on.
You’ll need a few essential tools for this process: a shovel, pickaxe, and possibly a backhoe rental if you’re dealing with a large excavation site. Start by marking out the trench’s dimensions and depth according to your root cellar design. Dig carefully, using a square-edged shovel or a trenching tool to maintain even sides.
As you dig, be mindful of underground utilities like pipes or cables that could compromise your root cellar’s integrity. If you’re unsure about any potential hazards, consult with local authorities or experts for guidance. Keep the area well-lit and ventilated to prevent accidents and ensure visibility throughout the digging process.
Constructing the Walls and Foundation
When constructing the walls and foundation of your root cellar, you’ll want to choose materials that provide durability, stability, and resistance to moisture. For a wood-framed wall, use pressure-treated lumber or naturally rot-resistant woods like cedar or cypress for the exterior frame. Fill in the gaps with insulation, such as foam board or fiberglass batts.
For a more permanent solution, consider using stone or concrete blocks for the walls. This option is ideal for areas prone to heavy rainfall or flooding. Ensure proper drainage by installing a French drain system around the perimeter of the cellar. A foundation made from poured concrete provides excellent stability and can be finished with a smooth, waterproof surface.
When building with wood, leave space between the wall studs for ventilation and easier access for maintenance. In colder climates, consider adding additional insulation to the walls or using materials with high R-values. If you’re using stone or concrete blocks, ensure they are properly aligned and laid on a level foundation to prevent structural issues down the line.
Insulating and Ventilating Your Root Cellar
Effective root cellar storage depends on maintaining a stable temperature, which is where proper insulation and ventilation come into play. A well-insulated and ventilated root cellar will keep your stored produce fresh for longer.
The Importance of Proper Insulation
Proper insulation plays a critical role in maintaining a stable temperature and humidity level within the root cellar. Without adequate insulation, the space can become too cold in winter and too warm in summer, leading to spoilage of stored produce. This is particularly problematic for root vegetables like carrots and beets, which require consistent cool temperatures to stay fresh.
Inadequate insulation can also lead to moisture accumulation, creating an environment conducive to mold growth and pest infestation. For example, if the walls and ceiling of the root cellar are not properly insulated, the stored produce may become too moist, causing it to rot quickly. To prevent this, consider using materials like foam board or straw bale insulation for the walls and ceiling.
When selecting insulation materials, choose those with good thermal mass, such as concrete or brick, which can help regulate temperature fluctuations. Additionally, ensure that any gaps or seams in the insulation are sealed to prevent air leaks and moisture entry. By prioritizing proper insulation, you can create a stable environment within your root cellar, allowing you to store produce for longer periods while maintaining its quality.
Installing Ventilation Systems
Proper ventilation is crucial for maintaining a healthy root cellar environment. Without adequate airflow, moisture can become trapped, leading to mold and rot. There are two primary types of ventilation systems: natural and mechanical.
Natural ventilation relies on the difference in temperature between the inside and outside air. As warm air rises, it creates a pressure gradient that pulls cooler air into the space through vents or openings. This method is often used in conjunction with insulation to maintain optimal conditions. However, natural ventilation can be limited by factors such as wind direction and surrounding terrain.
Mechanical ventilation systems use fans or blowers to circulate air. These can be powered by electricity or even gravity-fed from a nearby water source. Mechanical systems are ideal for root cellars with high humidity levels or those located in areas with poor airflow. A simple solution is to install a solar-powered fan, which can provide consistent ventilation without relying on external power sources.
When choosing a ventilation system, consider factors such as air exchange rate, moisture control, and energy efficiency. Always ensure that any installed vents or openings are properly screened to prevent pests from entering the space.
Maintaining Your Root Cellar: Tips and Tricks
Now that your root cellar is up and running, let’s focus on keeping it in top shape – we’ll cover essential tasks to maintain its optimal temperature and humidity.
Monitoring Temperature and Humidity Levels
Monitoring temperature and humidity levels is crucial for maintaining an optimal environment within your root cellar. A slight deviation from ideal conditions can lead to spoilage or pest infestations. To monitor temperatures, you’ll need a thermometer that’s specifically designed for basement or underground use. These thermometers typically have a probe that’s inserted into the air space of the root cellar, providing accurate readings of the ambient temperature.
Humidity levels are equally important and can be measured using a hygrometer. Aim to maintain a relative humidity between 50-70%. If the level drops below 40%, vegetables may become desiccated, while high humidity above 80% creates an ideal breeding ground for mold and mildew. To manage humidity, consider installing a dehumidifier or ensuring adequate ventilation.
Maintaining optimal temperature and humidity levels also involves understanding seasonal fluctuations. Typically, temperatures remain stable between 32°F (0°C) and 40°F (4°C), while relative humidity varies with the seasons. In winter, you may need to adjust your ventilation system to maintain a healthy balance of moisture. Regular monitoring allows you to make adjustments accordingly, ensuring that your root cellar remains in optimal condition for storing produce.
Managing Pests and Rodents
Preventing pests and rodents from invading your root cellar is crucial for maintaining a healthy storage environment. One of the most effective ways to keep them at bay is by using natural deterrents. Certain herbs, such as mint, basil, and lavender, are known to repel rodents due to their strong scents. You can plant these herbs around the perimeter of your root cellar or place them in small pots inside.
Another approach is to seal any potential entry points. Rodents can squeeze through tiny openings, so it’s essential to inspect your root cellar regularly for cracks and crevices. Use steel wool or expanding foam to fill gaps around pipes, electrical outlets, and windows. Make sure to also check the walls and floor of your root cellar for any signs of burrowing.
If you do encounter a pest problem, there are several humane traps available that allow you to release rodents outside of your property without harming them. It’s also important to keep your root cellar clean and free of clutter, as this can attract pests. Consider using a dehumidifier to maintain a humidity level between 80-90%, which is less appealing to rodents than higher or lower levels.
Harvesting and Storing Your Root Cellar Contents
Once you’ve harvested your root cellar contents, it’s time to store them properly to preserve their quality and flavor. Learn how to dry, can, and freeze your produce for long-term storage.
Preparing Vegetables for Storage
To ensure your stored vegetables remain fresh for as long as possible, it’s essential to prepare them correctly before storing. Start by cleaning each vegetable thoroughly to remove dirt and debris. For root vegetables like carrots and beets, gently brush off any excess soil with a soft-bristled brush. For leafy greens and herbs, quickly rinse them under cold running water to prevent moisture from accumulating.
Next, sort your stored vegetables by type, size, and condition. This helps maintain even air circulation and prevents damage to delicate items. Store firm, mature vegetables like potatoes and onions at the bottom of the root cellar, while more fragile or immature produce like lettuce and sprouts can be placed above them.
Finally, package each vegetable in a breathable material like paper bags, mesh bags, or ventilated containers to maintain humidity levels. Avoid using plastic bags, which can trap moisture and lead to rotting. Store packaged vegetables in a single layer, allowing for easy access and monitoring of their condition.
Tips for Long-Term Food Preservation
To maintain freshness and quality of stored items over an extended period, it’s essential to monitor temperature and humidity levels regularly. Aim for a consistent temperature between 32°F and 40°F (0°C and 4°C) and relative humidity above 90%. You can use hygrometers or thermometers specifically designed for root cellars to track these conditions.
Root vegetables like carrots, beets, and turnips are best stored in a breathable container, such as burlap bags or mesh sacks, to prevent moisture buildup. On the other hand, potatoes and onions require cooler temperatures (around 40°F/4°C) and lower humidity levels to prevent sprouting and decay.
For long-term preservation, consider using techniques like root cellaring, where items are stored in a dormant state, or dehydrating, which removes water content to inhibit spoilage. You can also use root cellar-friendly containers, such as wooden crates or wicker baskets, to store fruits and vegetables in separate areas to maintain optimal conditions for each type of produce.
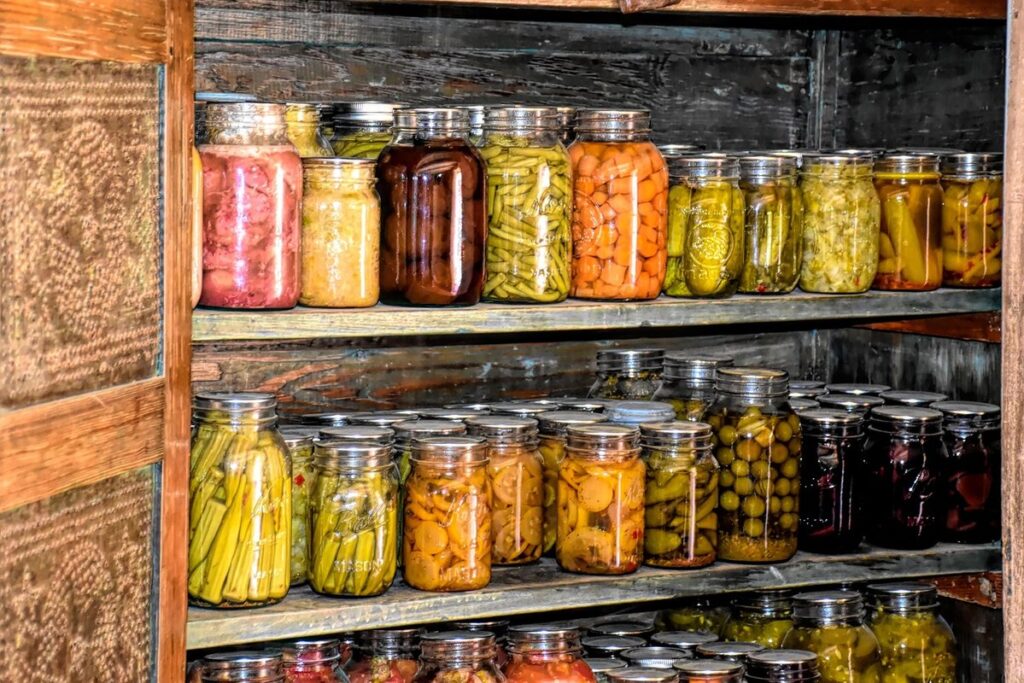
Some popular methods for preserving food in the long term include freezing, canning, and fermenting. These techniques require specific equipment and knowledge but can help extend the shelf life of your stored items beyond what’s possible with traditional root cellaring.
Frequently Asked Questions
How often should I inspect my root cellar for signs of pests and rodents?
Regular inspections are crucial to preventing infestations. We recommend checking your root cellar every 2-3 weeks, especially during peak pest seasons. Look for droppings, gnaw marks, or other signs of unwanted visitors.
Can I use a pre-made root cellar kit instead of building from scratch?
Yes, using a pre-made root cellar kit can be a convenient and time-saving option. These kits usually include all the necessary materials and instructions to build a basic root cellar. However, keep in mind that customizing your design might not be as flexible.
What if I live in an area with poor soil quality or high water tables? Can I still build a root cellar?
Yes, you can still build a root cellar even with challenging site conditions. Consider using a raised foundation or a waterproof membrane to protect against moisture and erosion. It’s essential to assess your site thoroughly before construction.
How do I know if my root cellar is too small for the amount of produce I want to store?
A good rule of thumb is to allocate about 1-2 cubic feet of storage space per person in your household. If you have a large family or plan to store a significant quantity of produce, consider increasing the size of your root cellar accordingly.
Can I use my root cellar for storing other types of food items besides vegetables and fruits?
Yes, root cellars can also be used to store canned goods, nuts, seeds, and even dairy products. However, ensure that you have adequate ventilation and temperature control in place to maintain the necessary conditions for each type of stored item.

