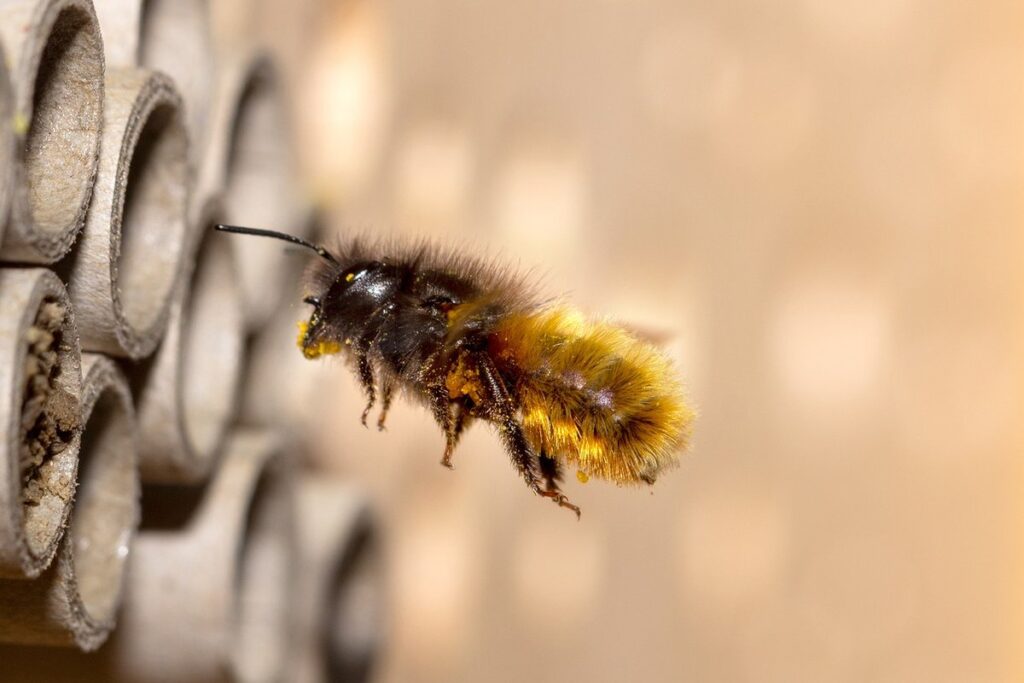
Creating a DIY mason bee home is a simple yet effective way to attract these vital pollinators to your garden. Mason bees, also known as Osmia spp., are essential for plant reproduction and are often overlooked in favor of more flashy bees like honeybees. However, they’re among the most important pollinators, responsible for visiting multiple flowers daily to collect pollen for their young. By creating a mason bee home using natural materials like wood or bamboo, you can provide these beneficial insects with a safe haven and encourage them to nest in your garden. In this article, we’ll walk you through a step-by-step guide on how to build a mason bee home DIY, including tips on choosing the right location and preparing the nesting site for these valuable pollinators.
Choosing the Right Location
When choosing a spot for your mason bee home, location is crucial: it needs to be protected from harsh weather and receive plenty of sunlight.
Understanding Mason Bee Behavior
Mason bees are solitary insects that nest individually, unlike honeybees which live in colonies. They prefer to nest in sheltered locations with full sun to partial shade, ideally south-facing walls or fences. This preference is crucial when choosing a location for your mason bee home.
When it comes to nesting habits, female mason bees use mud or plant material to construct their nests. They typically choose sites with nearby sources of water and an abundance of flowers that provide nectar and pollen. A common mistake beginners make is selecting a site with too much wind protection, which can be detrimental to mason bee populations.
In ideal conditions, mason bees will nest in cavities or holes around 6-10 millimeters in diameter, often reusing existing nesting sites year after year. When selecting a location for your DIY mason bee home, consider the surrounding environment and ensure it meets these basic needs: proximity to water, an abundance of flowers, and some shelter from harsh weather conditions.
Factors to Consider When Selecting a Site
When selecting a site for your mason bee home, there are three key factors to consider: sunlight exposure, proximity to water sources, and surrounding vegetation. Mason bees rely on warmth from sunlight to regulate their body temperature, so choose a location that receives at least six hours of direct sunlight per day.
Proximity to water is also crucial for mason bees, as they need access to a reliable source of water for drinking and egg-laying. Avoid areas prone to flooding or where water may be scarce during dry spells. A nearby pond, stream, or even a shallow dish filled with fresh water will suffice.
The surrounding vegetation can also impact the success of your mason bee home. Choose an area with minimal shade from tall trees or dense shrubs, as this can make it difficult for the bees to navigate and find nesting sites. Consider planting native flowers and herbs that attract pollinators and provide a source of nectar for the bees.
In general, a south-facing wall or fence is an ideal location for a mason bee home. This orientation provides optimal sunlight exposure while also allowing for easy access and maintenance.
Avoiding Common Mistakes
When choosing a location for your mason bee home, it’s essential to avoid common mistakes that can harm the health and success of your colony. One critical error is placing the home too close to areas where pesticides are used. Mason bees collect pollen and nectar from nearby flowers, so exposure to chemical residues on their bodies can be fatal. Keep your mason bee home at least 10-15 feet away from any pesticide application zones.
Another mistake is neglecting the need for a south-facing wall or exposure. Mason bees rely on warmth and sunlight to activate their nesting behavior, so the location should receive direct sunlight for most of the day. Avoid placing the home in shaded areas, such as under trees or near buildings with overhangs. If you’re installing a mason bee home in an existing garden, ensure it’s not too close to water sources, which can cause flooding and damage to the nesting site.
When selecting a location, also consider the proximity to food sources for the mason bees. Ideally, the home should be placed near a variety of flowers that bloom throughout the growing season, providing a steady supply of nectar and pollen for your mason bee colony.
Designing and Building Your Mason Bee Home
When it comes to building your mason bee home, choosing the right materials and design is crucial for attracting these beneficial insects. We’ll walk you through a simple and effective way to create a perfect haven.
Understanding Mason Bee Nest Requirements
Mason bees are highly specific about their nesting sites, and understanding these requirements is crucial for creating a welcoming home. They prefer natural materials like bamboo, hollow reeds, or untreated wood with pre-existing holes. These materials provide the necessary structure and texture for them to excavate and build their nests.
In terms of nest depth, mason bees typically choose sites between 5-15 inches deep, with an ideal range of 10-12 inches. This allows them to easily excavate cells for egg-laying and pollen storage without expending too much energy. A deeper nesting site can be beneficial in areas with high competition or harsh weather conditions.
When designing your home, consider using a variety of hole diameters and depths to accommodate different species of mason bees. Typically, holes range from 3-6 mm in diameter, with smaller species requiring narrower openings. Also, ensure the holes are at least 1 inch apart to prevent competition among females for nesting sites.
Keep in mind that masonry bees do not use existing cavities as a substitute for their own nesting efforts. They will instead create new cells within the cavity, so it’s essential to provide them with the necessary space and materials. By understanding these specific requirements, you can create a home that meets the needs of your local mason bee population.
DIY Materials and Supplies
To build a mason bee home from scratch, you’ll need some basic materials and tools. Start with a pre-made bee house as a pattern or reference point for designing your own. You can find these online or at local gardening stores. If you prefer to start from scratch, choose wood that’s untreated and free of chemicals – cedar, pine, and cypress are good options.
For the frame, use 1×6 or 1×8 boards, depending on the size of your home. Cut them into uniform pieces for the back, floor, and walls. You’ll also need nails to assemble the structure; use a hammer to tap them into place gently.
Some additional supplies you might find useful include sawdust or wood shavings for filling the cells, a drill for making holes, and a small brush for applying a waterproof sealant (optional). If you’re using a pre-made house as a guide, follow its dimensions and specifications closely. Remember to leave enough space between each cell for the mason bees to lay their eggs.
A few other items to consider are:
• Waterproof glue or sealant
• A small paintbrush for applying a finish coat
• A measuring tape for ensuring accuracy
• Safety glasses and gloves for protecting yourself during construction
Building Techniques for Mason Bee Homes
When building a mason bee home, you have several techniques at your disposal. One popular method is to use pre-drilled holes, which mimic the natural nesting sites of these beneficial insects. Drill holes about 6-8 inches deep and 3/8 inch in diameter, spaced about an inch apart. This arrangement allows multiple bees to nest without competition.
Alternatively, you can create custom nesting sites that cater to specific mason bee species. For example, if you’re targeting the blue orchard mason bee, use holes with a slightly larger diameter (about 1/2 inch) and deeper spacing (around 10-12 inches). This approach requires more planning but can be rewarding for enthusiasts who want to attract multiple species.
When creating custom sites, consider using different hole sizes or shapes to accommodate various bees. Some species, like the mason bee species Osmia lignaria, prefer holes with a slightly tapered shape. Experiment with different configurations and observe which ones work best in your local environment.
Installing and Maintaining Your Mason Bee Home
To ensure your mason bee home remains a thriving haven, it’s essential to understand how to properly install and maintain it. This involves several key steps that we’ll cover next.
Proper Installation Techniques
To ensure a healthy and thriving mason bee population, it’s essential to install your home properly. Start by selecting a secure location for your mason bee home. You can attach it to a south-facing wall or a wooden post using screws or nails. Make sure the surface is smooth and free of any debris.
For added stability, consider installing a bracket or a support system specifically designed for mason bee homes. This will help prevent wind damage and ensure the structure remains upright. Additionally, ensure proper ventilation by installing small gaps between the mason bee home’s compartments and the exterior wall or post. A 1-2 inch gap is sufficient to allow air circulation while preventing predators from entering.
When securing your mason bee home, avoid using nails that are too long or screws with coarse threads, as they may damage the surrounding material. Instead, opt for short nails or fine-threaded screws specifically designed for outdoor use.
Maintenance Tasks for a Healthy Population
Regular cleaning and inspection are crucial maintenance tasks for a healthy mason bee population. Start by removing any debris or dead bees from the home’s entrance and nesting cells. Use a soft-bristled brush to gently sweep away cobwebs and dust that can accumulate on the exterior. For more thorough cleaning, mix 1 tablespoon of mild dish soap with 1 quart of water and use a small paintbrush to scrub the interior surfaces of the nesting cells.
Inspect your mason bee home regularly for signs of wear or damage. Check for cracks in the walls or roof, which can allow pests like mice or spiders to enter. Also, verify that the entrance tunnel is not clogged with debris or plant material, as this can prevent bees from accessing the nest. If you notice any issues during your inspection, address them promptly to maintain a healthy environment for your mason bee population.
Some common signs of a thriving mason bee home include a steady flow of bees entering and exiting the tunnel and an abundance of nesting cells filled with eggs or larvae.
Monitoring Mason Bee Activity
When monitoring mason bee activity, it’s essential to track their numbers and identify potential issues with your home or surrounding environment. Start by observing the bees’ behavior around your home during peak activity periods, usually between 10 am and 3 pm on warm days. Note the number of bees visiting each nesting site, as well as any signs of competition for resources.
To accurately count mason bee numbers, use a simple observation sheet or a mobile app designed for insect monitoring. Record the date, time, weather conditions, and the number of bees seen at each site. This data will help you identify trends and patterns in their activity.
Some potential issues to watch out for include:
• Signs of predation: look for evidence of parasites, such as mites or wasps, on your mason bee population.
• Nesting site competition: if multiple species are competing for the same resources, it may impact mason bee populations.
• Environmental factors: extreme weather conditions, pesticide use, or nearby development can affect mason bee activity.
Regular monitoring will help you identify any issues early on and make adjustments to create a more welcoming environment for these beneficial insects.
Attracting Other Pollinators
Now that you have a thriving mason bee population, it’s time to consider attracting other pollinators to your garden by creating a welcoming habitat for them. This involves some simple adjustments to your DIY mason bee homes and surrounding environment.
Co-Habitation with Other Insects
When designing a mason bee home, it’s natural to wonder if you can co-habit with other beneficial insects. Some species of bees and wasps are compatible with mason bees, while others may not get along. Solitary bees like mason bees often co-exist with paper wasps, which prey on pests that harm crops.
However, carpenter bees, which are also solitary but much larger than mason bees, may compete for nesting sites. Honeybees are typically not a good match for mason bee homes, as they’re social and require a lot of space to store honey and pollen. Some species of flies, like hoverflies, can be beneficial but may still cause issues with their larvae competing for food.
To promote harmony among co-habiting insects, consider the following:
- Provide separate nesting areas or compartments to reduce competition.
- Choose a location with ample resources, such as nearby flowers for nectar and pollen.
- Avoid overcrowding your mason bee home, as this can lead to conflicts and reduced productivity.
- Research the specific needs of any additional species you plan to co-habit with.
Tips for Encouraging Diversity
When designing your mason bee home, consider incorporating features that attract a variety of pollinators. One way to do this is by adding nesting sites for solitary bees, such as hollow reeds or bamboo tubes, near your mason bee home. This can be done by placing them around the perimeter of the structure or nearby on a nearby wall.
Another approach is to incorporate different shapes and sizes of nesting cells within your mason bee home itself. Mason bees often share their nests with other beneficial insects like sweat bees, mason wasps, or even ants. By providing multiple types of nesting sites, you can create a welcoming environment for these co-habitants.
Consider the following when creating a diverse pollinator-friendly habitat:
- Leave some areas unmanaged to allow native plants and weeds to grow
- Incorporate a variety of plant species that bloom at different times to provide nectar sources throughout the growing season
- Avoid using pesticides or herbicides, which can harm beneficial insects
Troubleshooting Common Issues
Don’t worry if things don’t go as planned – mason bee homes can be a bit finicky, and we’ll tackle common problems that might arise during construction.
Identifying Problems with Your Mason Bee Home
Low occupancy rates are often the first sign of trouble with your mason bee home. Check for proper installation and ensure the home is facing east to southeast to capture warmth and sunlight. A damaged or incomplete nest can also deter bees from occupying the space. Inspect the nesting tubes for cracks, splits, or gaps that could provide an entry point for pests.
Look for signs of pest infestations, such as tunnels dug into surrounding materials or sawdust accumulating around the entrance. Mason mites and carpenter bees are common invaders that can harm your bee population. Regularly clean the home with a soft brush to remove debris and dirt that may attract pests.
A small minority of mason bee homes may also experience issues related to moisture, such as mold growth or water accumulation within the tubes. Check for condensation on the walls or roof of the home and ensure proper ventilation to prevent these problems.
In some cases, low occupancy rates can be due to the quality of the nesting materials used. Typically, a mix of reeds, bamboo, or hollow reeds works well for mason bees. Avoid using materials with sharp edges or splinters that could harm the bees during nesting.
Solutions to Common Problems
Addressing issues promptly is crucial for maintaining a healthy and thriving mason bee population. If you notice water accumulation inside the home, ensure it’s due to condensation rather than poor drainage. To resolve the issue, increase ventilation or add a slight incline to the roof.
Inspect the entrance tunnels regularly for blockages caused by debris or pests. Gently clean out any obstructions using a small brush or cloth. Regular maintenance can help prevent damage from pests like carpenter bees.
If you’re experiencing low mason bee activity, consider factors such as location and time of year. Mason bees are typically most active during late spring to early summer when flowers are in bloom. Check that your home’s placement provides adequate sunlight and shelter from harsh winds.
Aim for a 45-degree angle on the roof to ensure rainwater runs off effectively. Avoid using chemicals or pesticides near the home, as these can harm mason bees and other beneficial insects. Regularly inspecting your home and addressing issues promptly will help maintain a healthy population of mason bees.
Advanced Techniques for Mason Bee Home Builders
Take your mason bee home building skills to the next level by learning advanced techniques, such as using natural materials and complex designs. These expert-level tips will help you create the perfect haven for these beneficial insects.
Creating Custom Nesting Sites
When creating custom nesting sites for mason bees, you can experiment with different materials and designs to attract specific species or promote healthy populations. For instance, using cedar wood instead of pine can deter certain pests that target mason bee nests. You can also try adding a mixture of mud and plant material to the nesting site’s entrance, which mimics the natural soil composition that mason bees prefer.
To create a nesting site specifically designed for the blue orchard mason bee, consider using a vertical orientation with a narrow entrance hole (about 1/4 inch in diameter). This design allows the female mason bee to easily enter and exit while keeping predators out. On the other hand, if you’re trying to attract the alfalfa mason bee, use a horizontal nesting site with an entrance hole that’s slightly larger.
When designing custom nesting sites, it’s essential to consider the local climate and native plant species. For example, in areas with high humidity, using a material like bamboo or reeds can help maintain a stable moisture level within the nest. By understanding the specific needs of different mason bee species and incorporating these details into your design, you can create a customized nesting site that supports a healthy population of beneficial insects.
Tips for Scaling Up Your Operation
When scaling up your mason bee operation, it’s essential to focus on efficient nesting site management. This involves creating multiple sites with varying depths and diameters to accommodate different species and population sizes. Consider building tiered or multi-level structures that allow for easier maintenance and monitoring.
To increase production, prioritize resource optimization. This means ensuring a consistent food source by planting a variety of flowers that bloom at different times, as well as providing a reliable water supply. Some mason bee species are particularly attracted to specific plants, such as lavender or coneflowers, so research the needs of your local population.
When managing larger populations, be prepared for increased maintenance demands. Regularly inspect nesting sites to remove parasites and damaged cells, and ensure proper ventilation to prevent disease buildup. Consider implementing a rotation system where older nests are replaced with new ones to maintain population health.
A well-planned and executed scaling strategy can help you support the growth of your local mason bee population while minimizing the risk of overpopulating or depleting resources.
Expert Insights from Mason Bee Enthusiasts
Mason bee enthusiasts have been perfecting their craft for years, and their expertise can be invaluable to DIY builders. For instance, Emily Wilson, a seasoned mason bee breeder, emphasizes the importance of “observing and learning from nature.” She notes that by carefully monitoring mason bee behavior, builders can create more effective homes that meet their specific needs.
Another crucial aspect is understanding the unique requirements of different mason bee species. According to Mark Davis, a renowned mason bee researcher, each species has distinct preferences for nesting site orientation, entrance size, and chamber depth. By accommodating these specific needs, builders can increase the chances of successful colonization.
To create truly optimal homes, builders should also consider incorporating local, natural materials and designs that mimic natural environments. This approach not only attracts more mason bees but also provides a habitat for other beneficial insects. As Mark Davis advises, “Think like an ecologist when designing your home – prioritize biodiversity and minimize human intervention.”
Frequently Asked Questions
Can I use an existing hollow log as a mason bee home?
Yes, you can repurpose an existing hollow log to create a natural mason bee nesting site. Just ensure it’s free from any debris or pests and provide the necessary ventilation to maintain a healthy environment.
How long does it take for mason bees to occupy my DIY home?
The time it takes for mason bees to occupy your DIY home can vary depending on factors like location, weather, and availability of nearby nesting sites. Typically, you can expect some activity within 2-4 weeks after installation, but it may take up to 6-8 weeks for the home to be fully occupied.
Can I combine different types of pollinators in my mason bee home?
Yes, many species of bees and other beneficial insects can coexist in a well-designed mason bee home. However, research specific nesting preferences for each species to ensure harmonious co-habitation. Some popular combinations include solitary bees, leafcutter bees, and even wasps.
What are some signs that my mason bee home is being used successfully?
Look for signs like mason bee activity around the entrance holes, presence of cocoons or pupae within the nesting sites, and a general increase in local pollination. Regular monitoring will help you identify any potential issues and make adjustments to optimize your DIY mason bee home.
Can I use treated wood for my mason bee home?
No, it’s recommended to avoid using treated wood for your mason bee home as chemicals from the treatment can be toxic to the bees. Opt for untreated or naturally rot-resistant woods like cedar or cypress instead.